一、准备工作
1、android studio +自带模拟器(或者真机root)
2、frida(一个hook神器)
3、jeb(反编译利器)
4、java环境变量jdk的配置(谷歌)
5、gradle安装
6、ndk的配置与安装
二、开始编程
1、程序基础
1
2
3
4
5
6
7
8
| public class MainActivity extends AppCompatActivity {
@Override
protected void onCreate(Bundle savedInstanceState) {
super.onCreate(savedInstanceState);
setContentView(R.layout.activity_main);
}
}
|
所有的操作都是在oncreate中实现,这是定义一个大框架
2、日志查看与调试
在日志logcat打印出标签为flag的信息,很好用的调试小技巧,不同字母表示不同的日志信息
3、安卓元件的创建与控制
创建直接拖拽那个组件即可,想要控制时需要编程:
1
2
3
4
5
6
7
8
9
10
11
| final TextView text = findViewById(R.id.textView);
text.setText(“123”);
Button button2 = findViewById(R.id.button);
button2.setOnClickListener(new View.OnClickListener() {
@Override
public void onClick(View v) {
String flag = "138193670177974882514318186152745798548673891499230311600";
text.setText(flag);
Log.e("flag",flag);
}
});
|
4、弹窗的创建
1
2
3
4
5
6
| AlertDialog.Builder alertDialog1 = new AlertDialog.Builder(MainActivity.this);
alertDialog1.setTitle("恭喜!!");
alertDialog1.setMessage("登录成功");
alertDialog1.setIcon(R.mipmap.ic_launcher);
alertDialog1.create();
alertDialog1.show();
|
5、页面之间的跳转设置,在java的包下面,新建hhh类,构建好代码,下面是在Mainactivity中的代码
1
2
3
| Intent h = new Intent(MainActivity.this,hhh.class);
h.putExtra("name",b);
startActivity(h);
|
下面是hhh中的代码:
1
2
| Intent intent = getIntent();
String n = intent.getStringExtra("name");
|
最后要在manifests的application中声明下activity即可:
1
2
3
4
5
6
7
8
9
10
11
12
13
14
15
16
17
18
19
20
21
22
23
24
| <?xml version="1.0" encoding="utf-8"?>
<manifest xmlns:android="http://schemas.android.com/apk/res/android"
package="com.example.love">
<application
android:allowBackup="true"
android:icon="@mipmap/ic_launcher"
android:label="@string/app_name"
android:roundIcon="@mipmap/ic_launcher_round"
android:supportsRtl="true"
android:theme="@style/AppTheme">
<activity android:name=".MainActivity">
<intent-filter>
<action android:name="android.intent.action.MAIN" />
<category android:name="android.intent.category.LAUNCHER" />
</intent-filter>
</activity>
<activity
android:name=".hhh" >
</activity>
</application>
</manifest>
|
6、.so库文件的书写
下载ndk并且配置环境变量
直接在android studio中安装ndk,然后确定ndk的安装路径后,配置环境变量:
1
2
3
4
| vim ~/.bash_profile
export ANDROID_HOME=~/Library/Android/sdk
export PATH=${PATH}:${ANDROID_HOME}/ndk/21.0.6113669
source .bash_profile
|
检查时就输入ndk-build有回显即表示安装成功。
比如在Mainactivity中定义一个方法:
1
| public native String getname();
|
native方法只能通过.so库来调用,切换到Terminal,进入到该工程的 java 目录下(如下图所示),然后输入
javah -jni 包名.类名(如下图所示)
1
| v1ct0r@victordeMacBook-Pro java % javah -jni com.example.love.MainActivity
|
生成.h文件,参考作用而已。
1
2
3
4
5
6
7
8
9
10
11
12
13
14
15
16
17
18
19
20
21
|
#include <jni.h>
#ifndef _Included_com_example_love_MainActivity
#define _Included_com_example_love_MainActivity
#ifdef __cplusplus
extern "C" {
#endif
JNIEXPORT jstring JNICALL Java_com_example_love_MainActivity_getname
(JNIEnv *, jobject);
#ifdef __cplusplus
}
#endif
#endif
|
编写.c文件
这时我们切换到Project,然后在app目录下新建jni文件夹,并在里面建立一个demo.c的c文件(如下图所示)。
1
2
3
4
5
6
7
8
9
10
| #include <string.h>
#include <jni.h>
jstring Java_com_example_love_MainActivity_getname(JNIEnv *env, jobject thiz)
{
return (*env)->NewStringUTF(env, "I`m Str !");
}
jstring Java_com_example_love_hhh_getpwd(JNIEnv *env, jobject thiz)
{
return (*env)->NewStringUTF(env, "12345678");
}
|
知道一次以后都知道库函数怎么写了,要让哪个java类使用就要把类名写上,如上;
书写Android.mk文件,固定格式的
1
2
3
4
5
6
7
8
| LOCAL_PATH := $(call my-dir)
include $(CLEAR_VARS)
LOCAL_MODULE := demo
LOCAL_SRC_FILES := demo.c
include $(BUILD_SHARED_LIBRARY)
|
生成so文件
在控制台中,进入到工程的app目录下,然后输入ndk-build(如下所示),不出问题即可编译成功。
编译完成后刷新工程,可以看到在app目录下生成的libs和obj文件夹,其中libs是有用的,obj文件夹无用可以删除。libs中的可以看到生成的libdemo.so文件。
两个必要设置
a)、在local.properties中设置NDK路径,我的NDK示例如下:
1
2
| sdk.dir=/Users/v1ct0r/Library/Android/sdk
ndk.dir=/Users/v1ct0r/Library/Android/sdk/ndk/21.0.6113669
|
b)、在app的build.gradle的android节点下设置:
1
2
3
4
5
6
| sourceSets
{
main{
jniLibs.srcDirs = ['libs']
}
}
|
这两处必要的地方该修改完毕后就可以开心的调用我们生成的so文件了。
开始调用
在oncreate后面加入系统加载调用,然后可以直接在oncreate中调用我们的native方法
1
2
3
4
5
6
7
8
9
10
11
12
13
14
15
16
17
18
19
20
21
22
23
24
25
26
27
28
29
30
31
32
33
34
35
36
37
38
39
40
41
42
43
44
45
46
47
48
49
50
51
52
53
54
55
56
57
58
59
60
61
62
63
64
65
66
67
68
69
70
71
72
73
74
75
76
| package com.example.love;
import androidx.appcompat.app.AlertDialog;
import androidx.appcompat.app.AppCompatActivity;
import android.content.DialogInterface;
import android.content.Intent;
import android.os.Bundle;
import android.util.Log;
import android.view.View;
import android.widget.Button;
import android.widget.TextView;
public class MainActivity extends AppCompatActivity {
@Override
protected void onCreate(Bundle savedInstanceState) {
super.onCreate(savedInstanceState);
setContentView(R.layout.activity_main);
final TextView name = findViewById(R.id.editText2);
final TextView pwd = findViewById(R.id.editText);
name.setText(getname());
Button login = findViewById(R.id.button3);
Button register = findViewById(R.id.button);
register.setOnClickListener(new View.OnClickListener() {
@Override
public void onClick(View v) {
MainActivity.this.finish();
}
});
login.setOnClickListener(new View.OnClickListener() {
@Override
public void onClick(View v) {
String a = String.valueOf(name.getText());
final String b = String.valueOf(pwd.getText());
if(a.equals("yee")&&b.equals("iloveking"))
{
AlertDialog.Builder alertDialog1 = new AlertDialog.Builder(MainActivity.this);
alertDialog1.setTitle("Congratulation!!");
alertDialog1.setMessage("You pwn it!");
alertDialog1.setIcon(R.drawable.a);
alertDialog1.setNegativeButton("No", null);
alertDialog1.setPositiveButton("Yes", new DialogInterface.OnClickListener() {
public void onClick(DialogInterface dialog, int which) {
Intent h = new Intent(MainActivity.this,hhh.class);
h.putExtra("name",b);
startActivity(h);
}
});
alertDialog1.create();
alertDialog1.show();
}
else
{
AlertDialog.Builder alertDialog1 = new AlertDialog.Builder(MainActivity.this);
alertDialog1.setTitle("Sorry!!");
alertDialog1.setMessage("账号或者密码错误!");
alertDialog1.setIcon(R.mipmap.ic_launcher);
alertDialog1.create();
alertDialog1.show();
}
}
});
}
public native String getname();
static
{
System.loadLibrary("demo");
}
}
|
参考链接:
https://blog.csdn.net/leilifengxingmw/article/details/71598687
这里关于库文件的书写就涉及到我们的ndk开发了,这里就不做深入研究了,具体可以看我自己写的代码:
1
2
3
4
5
6
7
8
9
10
11
12
13
14
15
16
17
18
19
20
21
22
23
24
25
26
27
28
29
30
31
32
33
34
35
36
| #include <string.h>
#include <jni.h>
jstring Java_com_example_love_MainActivity_getname(JNIEnv *env, jobject thiz)
{
return (*env)->NewStringUTF(env, "I`m Str !");
}
jstring Java_com_example_love_hhh_getpwd(JNIEnv *env, jobject thiz)
{
return (*env)->NewStringUTF(env, "12345678");
}
jboolean Java_com_example_love_MainActivity_kkk(JNIEnv *env, jobject thiz, jstring s)
{
const char *c_str = NULL;
c_str = (*env)->GetStringUTFChars(env, s, 0);
int len = (*env)->GetStringUTFLength(env, s);
char b[100];
char c[100] = "kmomkuw";
for(int i=0;i<len;i++)
{
b[i] = ((c_str[i] + 10)^i);
}
int m = strcmp(b,c);
if(!m)
{
printf("Good!");
(*env)->ReleaseStringUTFChars(env, s, c_str);
return 1;
}
else
{
printf("Wrong!");
(*env)->ReleaseStringUTFChars(env, s, c_str);
return 0;
}
}
|
这三个函数都是我自己定义的,可以根据需要自己去书写,达到代码保护的作用。
7、fragement的使用
fragement是指片段,可以看成一个子活动,然后内容是可以替换的,有自己的生命周期其实,一般来说有add、remove、replace等操作,这里熟悉下常见的使用方法。
首先在libcs中导入库:android-support-v4.jar
这里面有很多封装函数,比如管理员函数等。
在java文件中的定义,新建一个fragment
1
2
3
4
5
6
7
8
9
10
11
12
13
14
15
16
17
18
19
20
21
22
23
24
25
26
27
28
| package com.example.love;
import androidx.lifecycle.ViewModelProviders;
import android.os.Bundle;
import androidx.annotation.NonNull;
import androidx.annotation.Nullable;
import androidx.fragment.app.Fragment;
import android.view.LayoutInflater;
import android.view.View;
import android.view.ViewGroup;
public class chatFragment extends Fragment {
public static chatFragment newInstance() {
return new chatFragment();
}
@Override
public View onCreateView(@NonNull LayoutInflater inflater, @Nullable ViewGroup container,
@Nullable Bundle savedInstanceState) {
return inflater.inflate(R.layout.chat_fragment, container, false);
}
}
|
然后在res中的layout文件中自动生成
1
2
3
4
5
6
7
8
9
10
11
12
13
14
15
16
17
| <?xml version="1.0" encoding="utf-8"?>
<androidx.constraintlayout.widget.ConstraintLayout xmlns:android="http://schemas.android.com/apk/res/android"
xmlns:app="http://schemas.android.com/apk/res-auto"
xmlns:tools="http://schemas.android.com/tools"
android:id="@+id/frameLayout"
android:layout_width="match_parent"
android:layout_height="match_parent"
tools:context=".chatFragment">
<TextView
android:id="@+id/textView7"
android:layout_width="wrap_content"
android:layout_height="wrap_content"
android:text="聊天界面"
tools:ignore="MissingConstraints" />
</androidx.constraintlayout.widget.ConstraintLayout>
|
可以在这里设置自己想要的一切布局,textview、button,或者嵌入图片,相当于一个子页面了。然后我们可以设置3个fragment,道理是一样的,接着需要一个管理员去管理这些fragment
管理员界面的生成,一个子活动activity
这里的功能主要是接收点击响应,然后去执行响应的fragemnt跳转,这里使用的是replace进行跳转
1
2
3
4
5
6
7
8
9
10
11
12
13
14
15
16
17
18
19
20
21
22
23
24
25
26
27
28
29
30
31
32
33
34
35
36
37
38
39
40
41
42
43
44
45
46
47
48
49
50
51
52
53
54
55
56
57
58
59
60
61
62
63
64
65
66
67
68
69
| package com.example.love;
import androidx.appcompat.app.AppCompatActivity;
import androidx.fragment.app.Fragment;
import androidx.fragment.app.FragmentManager;
import androidx.fragment.app.FragmentTransaction;
import android.annotation.SuppressLint;
import android.os.Bundle;
import android.view.View;
import android.widget.ImageView;
import android.widget.LinearLayout;
public class game1 extends AppCompatActivity {
private FragmentManager fragmentManager;
private FragmentTransaction transaction;
private ImageView image1;
private ImageView image2;
private ImageView image3;
@SuppressLint("ResourceType")
@Override
protected void onCreate(Bundle savedInstanceState) {
super.onCreate(savedInstanceState);
setContentView(R.layout.game1);
this.fragmentManager = this.getSupportFragmentManager();
this.transaction = this.fragmentManager.beginTransaction();
Fragment blank = new BlankFragment();
this.transaction.replace(R.id.abc, blank);
this.transaction.commit();
this.image1 = this.findViewById(R.id.imageView1);
this.image2 = this.findViewById(R.id.imageView2);
this.image3 = this.findViewById(R.id.imageView3);
}
@SuppressLint("ResourceType")
public void clickTitle(View target) {
LinearLayout layout = (LinearLayout)target;
if (layout == (LinearLayout)this.findViewById(R.id.t1)) {
this.image1.setImageDrawable(this.getResources().getDrawable(R.mipmap.execisesele));
this.image2.setImageDrawable(this.getResources().getDrawable(R.mipmap.course));
this.image3.setImageDrawable(this.getResources().getDrawable(R.mipmap.account));
this.transaction = this.fragmentManager.beginTransaction();
Fragment blankFragment = new BlankFragment();
this.transaction.replace(R.id.abc, blankFragment);
this.transaction.commit();
}
if (layout == (LinearLayout)this.findViewById(R.id.t2)) {
this.transaction = this.fragmentManager.beginTransaction();
Fragment testFragment = new TestFragment();
this.transaction.replace(R.id.abc, testFragment);
this.transaction.commit();
this.image1.setImageDrawable(this.getResources().getDrawable(R.mipmap.execise));
this.image2.setImageDrawable(this.getResources().getDrawable(R.mipmap.coursesele));
this.image3.setImageDrawable(this.getResources().getDrawable(R.mipmap.account));
}
if (layout == (LinearLayout)this.findViewById(R.id.t3)) {
this.transaction = this.fragmentManager.beginTransaction();
Fragment chatFragment = new chatFragment();
this.transaction.replace(R.id.abc, chatFragment);
this.transaction.commit();
this.image1.setImageDrawable(this.getResources().getDrawable(R.mipmap.execise));
this.image2.setImageDrawable(this.getResources().getDrawable(R.mipmap.course));
this.image3.setImageDrawable(this.getResources().getDrawable(R.mipmap.accountsele));
}
}
}
|
同时管理员的xml文件如下:
1
2
3
4
5
6
7
8
9
10
11
12
13
14
15
16
17
18
19
20
21
22
23
24
25
26
27
28
29
30
31
32
33
34
35
36
37
38
39
40
41
42
43
44
45
46
47
48
49
50
51
52
53
54
55
56
57
58
59
60
61
62
63
64
65
66
67
68
69
70
71
72
73
74
75
76
77
78
79
80
81
82
83
84
85
86
87
88
89
90
91
92
93
94
95
96
97
98
99
100
101
102
103
104
105
106
107
108
109
110
111
112
113
114
115
116
117
118
119
120
121
122
123
124
125
126
127
128
129
130
131
132
133
134
135
136
137
138
139
140
141
142
143
144
145
146
147
148
149
150
151
152
153
154
| <?xml version="1.0" encoding="utf-8"?>
<LinearLayout xmlns:android="http://schemas.android.com/apk/res/android"
xmlns:app="http://schemas.android.com/apk/res-auto"
xmlns:tools="http://schemas.android.com/tools"
android:id="@+id/LinearLayout1"
android:layout_width="match_parent"
android:layout_height="match_parent"
android:orientation="vertical"
android:paddingBottom="@dimen/activity_vertical_margin"
android:paddingLeft="@dimen/activity_horizontal_margin"
android:paddingRight="@dimen/activity_horizontal_margin"
android:paddingTop="@dimen/activity_vertical_margin"
tools:context=".game1" >
<FrameLayout
android:id="@+id/abc"
android:layout_width="match_parent"
android:layout_height="0dp"
android:layout_weight="1" >
</FrameLayout>
<LinearLayout
android:layout_width="match_parent"
android:layout_height="wrap_content"
android:gravity="center_horizontal" >
<LinearLayout
android:id="@+id/t1"
android:layout_width="0dp"
android:layout_height="wrap_content"
android:layout_weight="1"
android:gravity="center_vertical"
android:onClick="clickTitle"
android:orientation="vertical"
tools:ignore="OnClick">
<ImageView
android:id="@+id/imageView1"
android:layout_width="wrap_content"
android:layout_height="wrap_content"
android:layout_gravity="center_horizontal"
android:src="@mipmap/course" />
<TextView
android:id="@+id/textView1"
android:layout_width="wrap_content"
android:layout_height="wrap_content"
android:layout_gravity="center_horizontal"
android:text="教程" />
</LinearLayout>
<LinearLayout
android:id="@+id/t2"
android:layout_width="0dp"
android:layout_height="match_parent"
android:layout_weight="1"
android:onClick="clickTitle"
android:orientation="vertical"
tools:ignore="OnClick">
<ImageView
android:id="@+id/imageView2"
android:layout_width="wrap_content"
android:layout_height="wrap_content"
android:layout_gravity="center_horizontal"
android:src="@mipmap/execise" />
<TextView
android:id="@+id/textView2"
android:layout_width="wrap_content"
android:layout_height="wrap_content"
android:layout_gravity="center_horizontal"
android:text="练习" />
</LinearLayout>
<LinearLayout
android:id="@+id/t3"
android:layout_width="0dp"
android:layout_height="match_parent"
android:layout_weight="1"
android:onClick="clickTitle"
android:orientation="vertical"
tools:ignore="OnClick">
<ImageView
android:id="@+id/imageView3"
android:layout_width="wrap_content"
android:layout_height="wrap_content"
android:layout_gravity="center_horizontal"
android:src="@mipmap/talk" />
<TextView
android:id="@+id/textView3"
android:layout_width="wrap_content"
android:layout_height="wrap_content"
android:layout_gravity="center_horizontal"
android:text="对话" />
</LinearLayout>
<LinearLayout
android:id="@+id/t4"
android:layout_width="0dp"
android:layout_height="match_parent"
android:layout_weight="1"
android:onClick="clickTitle"
android:orientation="vertical"
tools:ignore="OnClick">
<ImageView
android:id="@+id/imageView4"
android:layout_width="wrap_content"
android:layout_height="wrap_content"
android:layout_gravity="center_horizontal"
android:src="@mipmap/community" />
<TextView
android:id="@+id/textView4"
android:layout_width="wrap_content"
android:layout_height="wrap_content"
android:layout_gravity="center_horizontal"
android:text="社区" />
</LinearLayout>
<LinearLayout
android:id="@+id/t5"
android:layout_width="0dp"
android:layout_height="match_parent"
android:layout_weight="1"
android:orientation="vertical" >
<ImageView
android:id="@+id/imageView5"
android:layout_width="wrap_content"
android:layout_height="wrap_content"
android:layout_gravity="center_horizontal"
android:src="@mipmap/account" />
<TextView
android:id="@+id/textView5"
android:layout_width="wrap_content"
android:layout_height="wrap_content"
android:layout_gravity="center_horizontal"
android:text="账号" />
</LinearLayout>
</LinearLayout>
</LinearLayout>
|
这里有一个坑点可以自己记一下,就是mipmap中的图片约定是小图,就是那种图标型号的图,但是drawable里面的是大图,二者对图片的解析不同,所以请严格按照自己需求去使用大图和小图,同时大图小图放置的位置也要相应!还有只认png!
8、gridview的使用
叫做网格布局,这是比较规矩的使用,方法如下:
1
2
3
4
5
6
7
8
9
10
11
12
13
14
15
16
17
18
19
20
21
22
23
24
25
26
27
28
29
30
31
32
33
34
35
36
37
38
39
40
41
42
43
44
45
46
47
48
49
50
51
52
53
54
55
56
57
58
59
60
61
62
63
64
65
66
67
68
69
70
| package com.example.love;
import android.content.Intent;
import android.os.Bundle;
import android.util.Log;
import android.view.View;
import android.widget.AdapterView;
import android.widget.Button;
import android.widget.GridView;
import android.widget.SimpleAdapter;
import android.widget.TextView;
import android.widget.Toast;
import androidx.appcompat.app.AppCompatActivity;
import java.util.ArrayList;
import java.util.HashMap;
import java.util.List;
import java.util.Map;
public class hhh extends AppCompatActivity {
int k = 0;
private GridView gridView;
private List<Map<String, Object>> data_list;
private SimpleAdapter adapter;
private int[] icons = {R.mipmap.ic_launcher, R.mipmap.ic_launcher, R.mipmap.ic_launcher,R.mipmap.ic_launcher, R.mipmap.ic_launcher, R.mipmap.ic_launcher, R.mipmap.ic_launcher, R.mipmap.ic_launcher, R.mipmap.ic_launcher, R.mipmap.ic_launcher, R.mipmap.ic_launcher, R.mipmap.ic_launcher, R.mipmap.ic_launcher, R.mipmap.ic_launcher, R.mipmap.ic_launcher , R.mipmap.ic_launcher};
private String[] text = {"王者荣耀", "吃鸡", "忍者", "火柴人", "方块", "炮弹战车", "米莱迪", "荣耀", "贪吃蛇", "弹弹堂", "皮卡丘大冒险", "神罗天征", "地包天行", "佐助", "漩涡鸣人","人工智能"};
@Override
protected void onCreate(Bundle savedInstanceState) {
super.onCreate(savedInstanceState);
setContentView(R.layout.hhh);
Intent intent = getIntent();
TextView text = findViewById(R.id.textView6);
String n = intent.getStringExtra("name");
text.setText(n);
gridView = (GridView) findViewById(R.id.king);
data_list = new ArrayList<Map<String, Object>>();
getData();
String[] form = {"image", "text"};
int[] to = {R.id.image, R.id.text};
adapter = new SimpleAdapter(this, data_list, R.layout.item, form, to);
gridView.setAdapter(adapter);
gridView.setOnItemClickListener(new AdapterView.OnItemClickListener() {
@Override
public void onItemClick(AdapterView<?> adapterView, View view, int i, long l) {
Toast.makeText(hhh.this, "你点击了第" + i, Toast.LENGTH_SHORT).show();
}
});
}
public List<Map<String, Object>> getData() {
for (int i = 0; i < icons.length; i++) {
Map<String, Object> map = new HashMap<String, Object>();
map.put("image", icons[i]);
map.put("text", text[i]);
data_list.add(map);
}
return data_list;
}
public native String getpwd();
static
{
System.loadLibrary("demo");
}
}
|
xml文件如下:
1
2
3
4
5
6
7
8
9
10
11
12
13
14
15
16
17
18
19
20
21
22
23
24
25
26
27
28
29
30
31
32
33
34
35
36
37
38
39
40
41
42
43
44
45
| <?xml version="1.0" encoding="utf-8"?>
<LinearLayout xmlns:android="http://schemas.android.com/apk/res/android"
xmlns:app="http://schemas.android.com/apk/res-auto"
xmlns:tools="http://schemas.android.com/tools"
android:orientation="vertical" android:layout_width="match_parent"
android:layout_height="match_parent">
<androidx.constraintlayout.widget.ConstraintLayout
android:layout_width="match_parent"
android:layout_height="match_parent">
<TextView
android:id="@+id/textView6"
android:layout_width="317dp"
android:layout_height="86dp"
android:layout_marginStart="47dp"
android:layout_marginLeft="47dp"
android:layout_marginEnd="31dp"
android:layout_marginRight="31dp"
android:layout_marginBottom="272dp"
android:gravity="center"
android:text="TextView"
android:textSize="24sp"
app:layout_constraintBottom_toBottomOf="parent"
app:layout_constraintEnd_toEndOf="parent"
app:layout_constraintHorizontal_bias="0.0"
app:layout_constraintStart_toStartOf="parent"
app:layout_constraintTop_toTopOf="parent"
app:layout_constraintVertical_bias="0.042" />
<GridView
android:id="@+id/king"
android:layout_width="411dp"
android:layout_height="546dp"
android:columnWidth="90dp"
android:horizontalSpacing="6dp"
android:numColumns="auto_fit"
android:stretchMode="columnWidth"
android:verticalSpacing="6dp"
tools:layout_editor_absoluteX="0dp"
tools:layout_editor_absoluteY="185dp"
tools:ignore="MissingConstraints"></GridView>
</androidx.constraintlayout.widget.ConstraintLayout>
</LinearLayout>
|
只要部署了gridview即可,因为数据的填入是个动态的过程来的,但是我喜欢用相对布局更多hhhhh。
9、连接数据库
准备工作:mysql数据库、mysql_workbench管理者、mysql-connector-java-5.1.30-bin.jar驱动
首先下载mysql,记住是老版本的!5.1.30左右,新版本有坑,不兼容哎,难受
然后下载个mysql的manager,我用的是mac下的mysql_workbench,主要是用户界面实现操作数据库。
接着在libcs中导入mysql的驱动即可
使用方法:
1
2
3
4
5
6
7
8
9
10
11
12
13
14
15
16
17
18
19
20
21
22
23
24
25
26
27
28
29
30
31
32
33
34
35
36
37
38
39
40
41
42
43
44
45
46
47
48
49
50
51
52
53
54
55
56
57
58
59
60
61
62
63
64
65
66
67
68
69
70
71
72
73
74
75
76
77
78
79
80
81
82
83
84
85
86
87
88
89
90
91
92
93
94
95
96
97
98
99
100
101
102
103
104
105
106
107
108
109
110
111
112
113
114
115
116
117
118
119
120
121
122
123
124
125
126
127
128
129
130
131
132
133
134
135
136
137
138
| package com.example.love;
import androidx.appcompat.app.AlertDialog;
import androidx.appcompat.app.AppCompatActivity;
import android.content.DialogInterface;
import android.content.Intent;
import android.os.Bundle;
import android.os.Looper;
import android.util.Log;
import android.view.View;
import android.widget.Button;
import android.widget.TextView;
import android.widget.Toast;
import java.math.BigInteger;
import java.security.MessageDigest;
import java.sql.*;
public class MainActivity extends AppCompatActivity {
public static String getMD5(String str) throws Exception {
try {
MessageDigest md = MessageDigest.getInstance("MD5");
md.update(str.getBytes());
return new BigInteger(1, md.digest()).toString(16);
} catch (Exception e) {
throw new Exception("MD5加密出现错误");
}
}
public void tan(String a,String gg,String ii)
{
if (ii.equals(gg)) {
Looper.prepare();
Log.e("调试", "777");
AlertDialog.Builder alertDialog1 = new AlertDialog.Builder(MainActivity.this);
alertDialog1.setTitle("提示:");
alertDialog1.setMessage("登录成功!");
alertDialog1.setIcon(R.drawable.k8);
alertDialog1.create();
alertDialog1.show();
Intent k = new Intent(MainActivity.this, game1.class);
k.putExtra("name", a);
startActivity(k);
Looper.loop();
} else {
Looper.prepare();
AlertDialog.Builder alertDialog1 = new AlertDialog.Builder(MainActivity.this);
alertDialog1.setTitle("提示:");
alertDialog1.setMessage("账号或密码错误!");
alertDialog1.setIcon(R.drawable.k8);
alertDialog1.create();
alertDialog1.show();
Looper.loop();
}
}
@Override
protected void onCreate(Bundle savedInstanceState) {
super.onCreate(savedInstanceState);
setContentView(R.layout.activity_main);
final TextView name = findViewById(R.id.editText2);
final TextView pwd = findViewById(R.id.editText);
Button login = findViewById(R.id.button3);
Button register = findViewById(R.id.button);
register.setOnClickListener(new View.OnClickListener() {
@Override
public void onClick(View v) {
Intent a = new Intent(MainActivity.this,register.class);
startActivity(a);
}
});
login.setOnClickListener(new View.OnClickListener() {
@Override
public void onClick(View v) {
new Thread() {
public void run() {
try {
Class.forName("com.mysql.jdbc.Driver");
String url = "jdbc:mysql://192.168.43.166:3306/test";
Log.e("1", "93994");
Connection conn = DriverManager.getConnection(url, "root", "7758");
if (conn != null) {
Log.e("调试", "连接成功");
Statement stmt = conn.createStatement();
String a = String.valueOf(name.getText());
String sql = "select * from user where uname=" + "'" + a + "'";
ResultSet rs = stmt.executeQuery(sql);
if (rs.next()) {
Log.e("调试", "777");
String gg = rs.getString("upwd");
System.out.println("here--->" + gg);
String d = String.valueOf(pwd.getText());
String ii = getMD5(d);
tan(a,gg, ii);
}
else
{
Looper.prepare();
AlertDialog.Builder alertDialog1 = new AlertDialog.Builder(MainActivity.this);
alertDialog1.setTitle("提示:");
alertDialog1.setMessage("该用户不存在!");
alertDialog1.setIcon(R.drawable.i1);
alertDialog1.create();
alertDialog1.show();
Looper.loop();
}
}
} catch (ClassNotFoundException e) {
e.printStackTrace();
} catch (SQLException e) {
e.printStackTrace();
} catch (Exception e) {
e.printStackTrace();
}
}
}.start();
}
});
}
public native String getname();
public native boolean kkk(String a);
static
{
System.loadLibrary("demo");
}
}
|
千万记得在androidmanifest.xml中加入这句允许远程连接:
1
| <uses-permission android:name="android.permission.INTERNET" />
|
***这里有个坑就是,非ui线程中的弹窗的使用,由于在非ui线程中,所以需要在弹窗的前后加 Looper.prepare()和Looper.loop(),如上的代码可见,相当于开辟一个资源给他用,不会被线程强行遏制住,如果不在非ui线程中,就不用这么操作;ui相关的操作需要在主线程调用,所以如果你是在ui线程中操作,需要转到主线程中,这里可以使用runOnUiThread,其实就是去ui线程更新,具体操作如下:
runOnUiThread() 相当于 是把 ui更新的任务 从 非ui线程 发送到了ui线程,ui线程的handler接受后去处理
1
2
3
4
5
6
7
8
9
10
11
12
13
14
15
16
17
18
19
20
21
22
| final TextView tv_dancishu = view.findViewById(R.id.tv_zhu_book);
new Thread() {
public void run() {
try {
String sql = "select BookName from DanCiShu where flag=1";
ResultSet rs = SQL.search(sql);
if (rs.next()) {
final String bn = rs.getString("BookName");
System.out.println(bn);
getActivity().runOnUiThread(new Runnable() {
public void run() {
tv_dancishu.setText(bn);
}
});
}
} catch (SQLException ex) {
ex.printStackTrace();
} catch (Exception ex) {
ex.printStackTrace();
}
}
}.start();
|
10、样式的使用
这个简单,就是加入插件的背景,使得插件变得更好看而已,这里在drawable中加入样式文件xml,可以自己定义形状,颜色,长宽比等属性,比如button的样式cc.xml
1
2
3
4
5
6
7
8
9
10
11
12
13
14
15
16
17
| <?xml version="1.0" encoding="utf-8"?>
<selector xmlns:android="http://schemas.android.com/apk/res/android">
<!--<item android:state_pressed="true">-->
<!--<shape android:shape="rectangle">-->
<!--<stroke android:width="1px" android:color="@color/color_light_grey" />-->
<!--<corners android:radius="3dp" />-->
<!--<solid android:color="@color/color_detach_line" />-->
<!--</shape>-->
<!--</item>-->
<item>
<shape android:shape="rectangle">
<stroke android:width="1px" android:color="@color/black" />
<corners android:radius="10dp" />
<solid android:color="@color/white" />
</shape>
</item>
</selector>
|
样式的使用也很简单,直接在背景中添加想要的样式即可
1
2
3
4
5
6
7
8
9
10
11
12
13
| <Button
android:id="@+id/button3"
android:layout_width="wrap_content"
android:layout_height="wrap_content"
android:text="登陆"
android:textSize="18sp"
android:background="@drawable/cc"
app:layout_constraintBottom_toBottomOf="parent"
app:layout_constraintEnd_toEndOf="parent"
app:layout_constraintHorizontal_bias="0.269"
app:layout_constraintStart_toStartOf="parent"
app:layout_constraintTop_toTopOf="parent"
app:layout_constraintVertical_bias="0.717" />
|
11、菜单的生成和使用
首先在res目录下创建menu,然后新建xml文件
1
2
3
4
5
6
7
8
9
10
11
12
13
14
| <?xml version="1.0" encoding="utf-8"?>
<menu xmlns:android="http://schemas.android.com/apk/res/android">
<item android:id="@+id/menu_item1" android:title="Functions">
<menu>
<item android:id="@+id/menu_item1_item1"
android:title="Map" />
<item android:id="@+id/menu_item1_item2"
android:title="Phone" />
<item android:id="@+id/menu_item1_item3"
android:title="Search" />
</menu>
</item>
<item android:id="@+id/menu_item2" android:title="Setting" />
</menu>
|
这里就是对于菜单的静态生成
然后在activity中加入我们需要定义的函数
1
2
3
4
5
6
7
8
9
10
11
12
13
| public boolean onCreateOptionsMenu(Menu menu) {
getMenuInflater().inflate(R.menu.game_menu, menu);
return super.onCreateOptionsMenu(menu);
}
public boolean onOptionsItemSelected(MenuItem item) {
switch (item.getItemId()) {
case R.id.menu_item2:
return true;
case R.id.menu_item1_item1:
return true;
}
return super.onOptionsItemSelected(item);
}
|
12、网页请求与回显
1、环境配置:
首先将需要的xUtils-3.3.20.jar包和gson-2.2.2.jar包导入到libc目录下,然后选中右键add as library,就可以使用相应的函数功能了
1
2
3
4
5
6
7
8
9
10
11
12
13
14
15
| dependencies {
implementation fileTree(include: ['*.jar'], dir: 'libs')
implementation 'androidx.appcompat:appcompat:1.0.2'
implementation 'androidx.constraintlayout:constraintlayout:1.1.3'
implementation 'androidx.legacy:legacy-support-v4:1.0.0'
implementation 'androidx.lifecycle:lifecycle-extensions:2.0.0'
implementation 'com.google.android.material:material:1.1.0'
implementation 'androidx.recyclerview:recyclerview:1.0.0'
testImplementation 'junit:junit:4.12'
androidTestImplementation 'androidx.test.ext:junit:1.1.0'
androidTestImplementation 'androidx.test.espresso:espresso-core:3.1.1'
implementation files('src/main/libcs/mysql-connector-java-5.1.30-bin.jar')
implementation files('src/main/libcs/gson-2.2.2.jar')
implementation files('src/main/libcs/xUtils-3.3.20.jar')
}
|
接着在AndroidManifest.xml中设置权限,在application中加入name
1
2
3
4
5
6
7
8
9
10
11
12
13
14
15
16
17
18
19
20
21
22
23
24
25
26
27
28
29
30
31
32
33
34
| <?xml version="1.0" encoding="utf-8"?>
<manifest xmlns:android="http://schemas.android.com/apk/res/android"
xmlns:tools="http://schemas.android.com/tools"
package="com.example.love">
//设置权限,让其能访问
<uses-permission android:name="android.permission.INTERNET" />
<uses-permission android:name="android.permission.WRITE_EXTERNAL_STORAGE" />
<application
android:name=".MyApplication" //加自己定义的myapplation类的名字
android:allowBackup="true"
android:icon="@drawable/k8"
android:label="@string/app_name"
android:roundIcon="@drawable/k8"
android:supportsRtl="true"
android:theme="@style/AppTheme">
<activity android:name=".test"></activity>
<activity
android:name=".abc"
android:label="@string/title_activity_abc"
android:theme="@style/AppTheme.NoActionBar" />
<activity android:name=".register" />
<activity android:name=".game1" />
<activity android:name=".MainActivity">
<intent-filter>
<action android:name="android.intent.action.MAIN" />
<category android:name="android.intent.category.LAUNCHER" />
</intent-filter>
</activity>
<activity android:name=".hhh" />
</application>
</manifest>
|
2、创建一个MyApplation.java类,里面进行一个初始化操作
1
2
3
4
5
6
7
8
9
10
11
12
13
14
15
16
| package com.example.love;
import android.app.Application;
import org.xutils.x;
public class MyApplication extends Application {
@Override
public void onCreate() {
super.onCreate();
x.Ext.init(this);
x.Ext.setDebug(false);
}
}
|
3、创建想要的activity,在里面实现网页请求
1
2
3
4
5
6
7
8
9
10
11
12
13
14
15
16
17
18
19
20
21
22
23
24
25
26
27
28
29
30
31
32
33
34
35
36
37
38
39
40
41
42
43
44
45
46
47
48
49
50
51
52
53
54
55
56
57
58
59
60
61
62
63
64
| package com.example.love;
import org.xutils.x;
import org.xutils.http.RequestParams;
import org.xutils.view.annotation.ContentView;
import org.xutils.view.annotation.Event;
import org.xutils.view.annotation.ViewInject;
import android.os.Bundle;
import android.util.Log;
import android.view.View;
import android.widget.TextView;
import android.widget.Toast;
import androidx.appcompat.app.AppCompatActivity;
import org.xutils.common.Callback;
@ContentView(R.layout.test)
public class test extends AppCompatActivity {
@ViewInject(R.id.textView11)
TextView text;
@Override
protected void onCreate(Bundle savedInstanceState) {
super.onCreate(savedInstanceState);
x.view().inject(this);
disp();
}
@SuppressLint("WrongConstant")
@Event(value = R.id.textView11, type = View.OnClickListener.class)
private void btnClick(View view) {
Toast.makeText(test.this,"test", 1).show();
}
public void disp() {
String url = "https://www.baidu.com/";
RequestParams params = new RequestParams(url);
System.out.println("233333333");
x.http().get(params, new Callback.CommonCallback<String>() {
@Override
public void onCancelled(CancelledException arg0) {
System.out.println("777777777");
}
@Override
public void onError(Throwable arg0, boolean arg1) {
System.out.println("8888888888");
}
@Override
public void onFinished() {
System.out.println("999999999");
}
@Override
public void onSuccess(String arg0) {
Log.e("gson",arg0);
try {
System.out.println("1111111111111");
text.setText(arg0);
} catch (Exception e) {
System.out.println("2222222222222");
e.printStackTrace();
}
}
});
}
}
|
13、打包好项目,生成可安装使用的apk程序文件
1、选择build中的generate signed apk
2、选择apk
3、选择一个key(已经存在的AI.jks)密码是123456
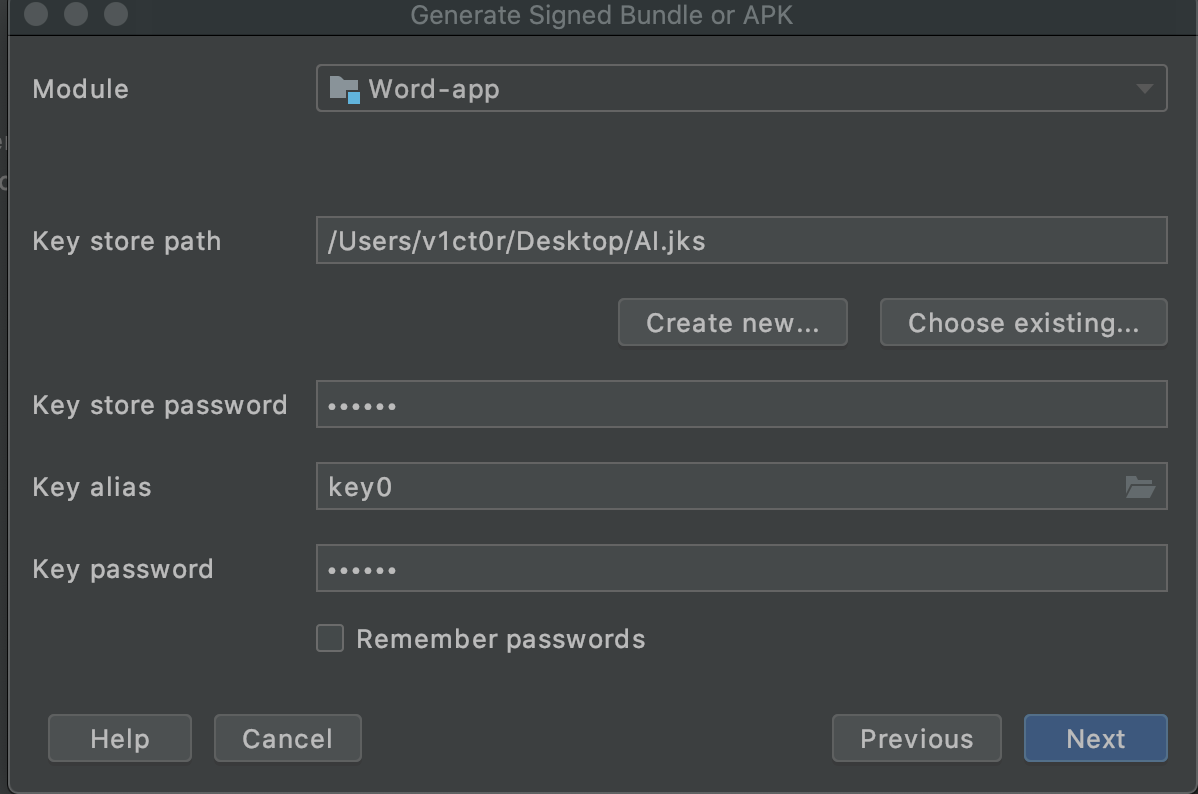
4、选择发行版本并选择第一个jar签名即可
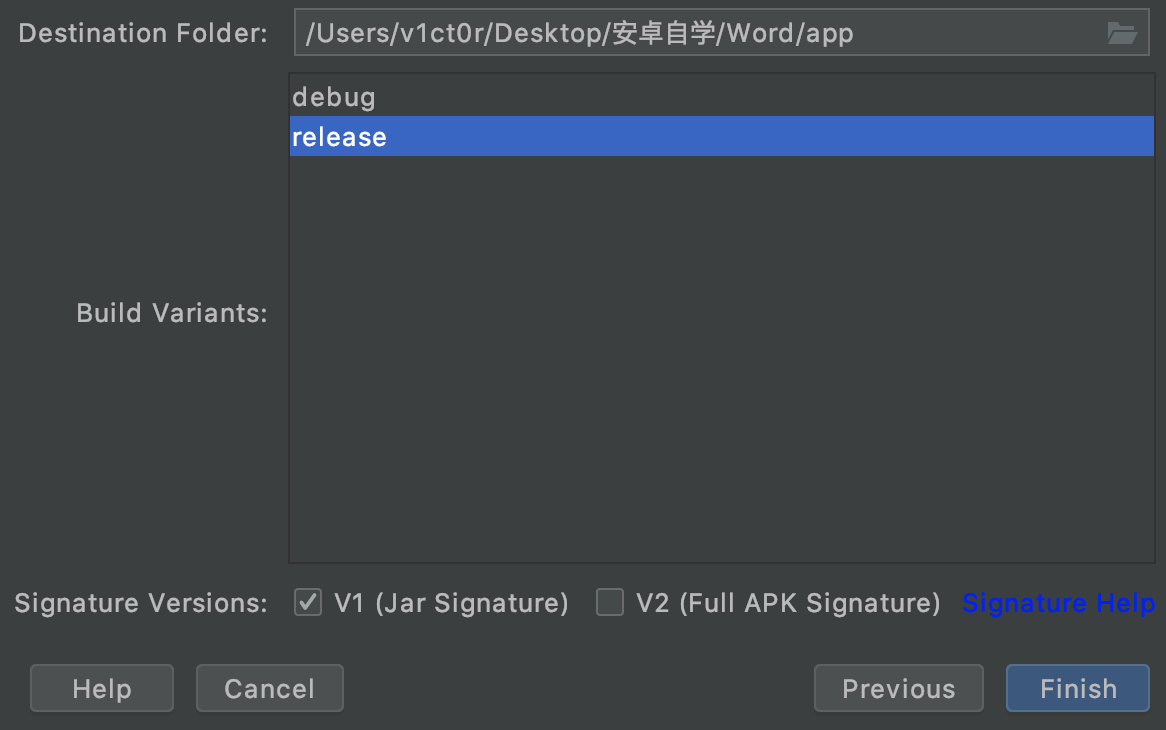
5、然后可以在项目的release目录下找到这个打包签名好的apk文件